

SPRINTER VAN BUILD
This is the story of how I went from an RV to a beautiful, custom-designed Sprinter van. I documented the whole van build process the best I could, with many details on the what was used by my van builder. To see more photos, you can click on the ‘Instagram Post’ link under each section’s photo. Since I’m a music buff, each section is a song title to make it a bit more interesting and fun, especially since this website started out mainly focused on my music business ventures. Songs are also listed in each section to satisfy your musical curiosity.

(JUST LIKE) STARTING OVER
After driving my 20 ft Mini-Class C RV for 2.5 years, I learned a lot about how I used the small space, what I liked and didn’t like about the layout, as well as what I used or didn't use inside the RV. I never felt 100% comfortable driving it and really hated how top heavy it was with the over-the-cab bed. I also had a minor fender bender in it.
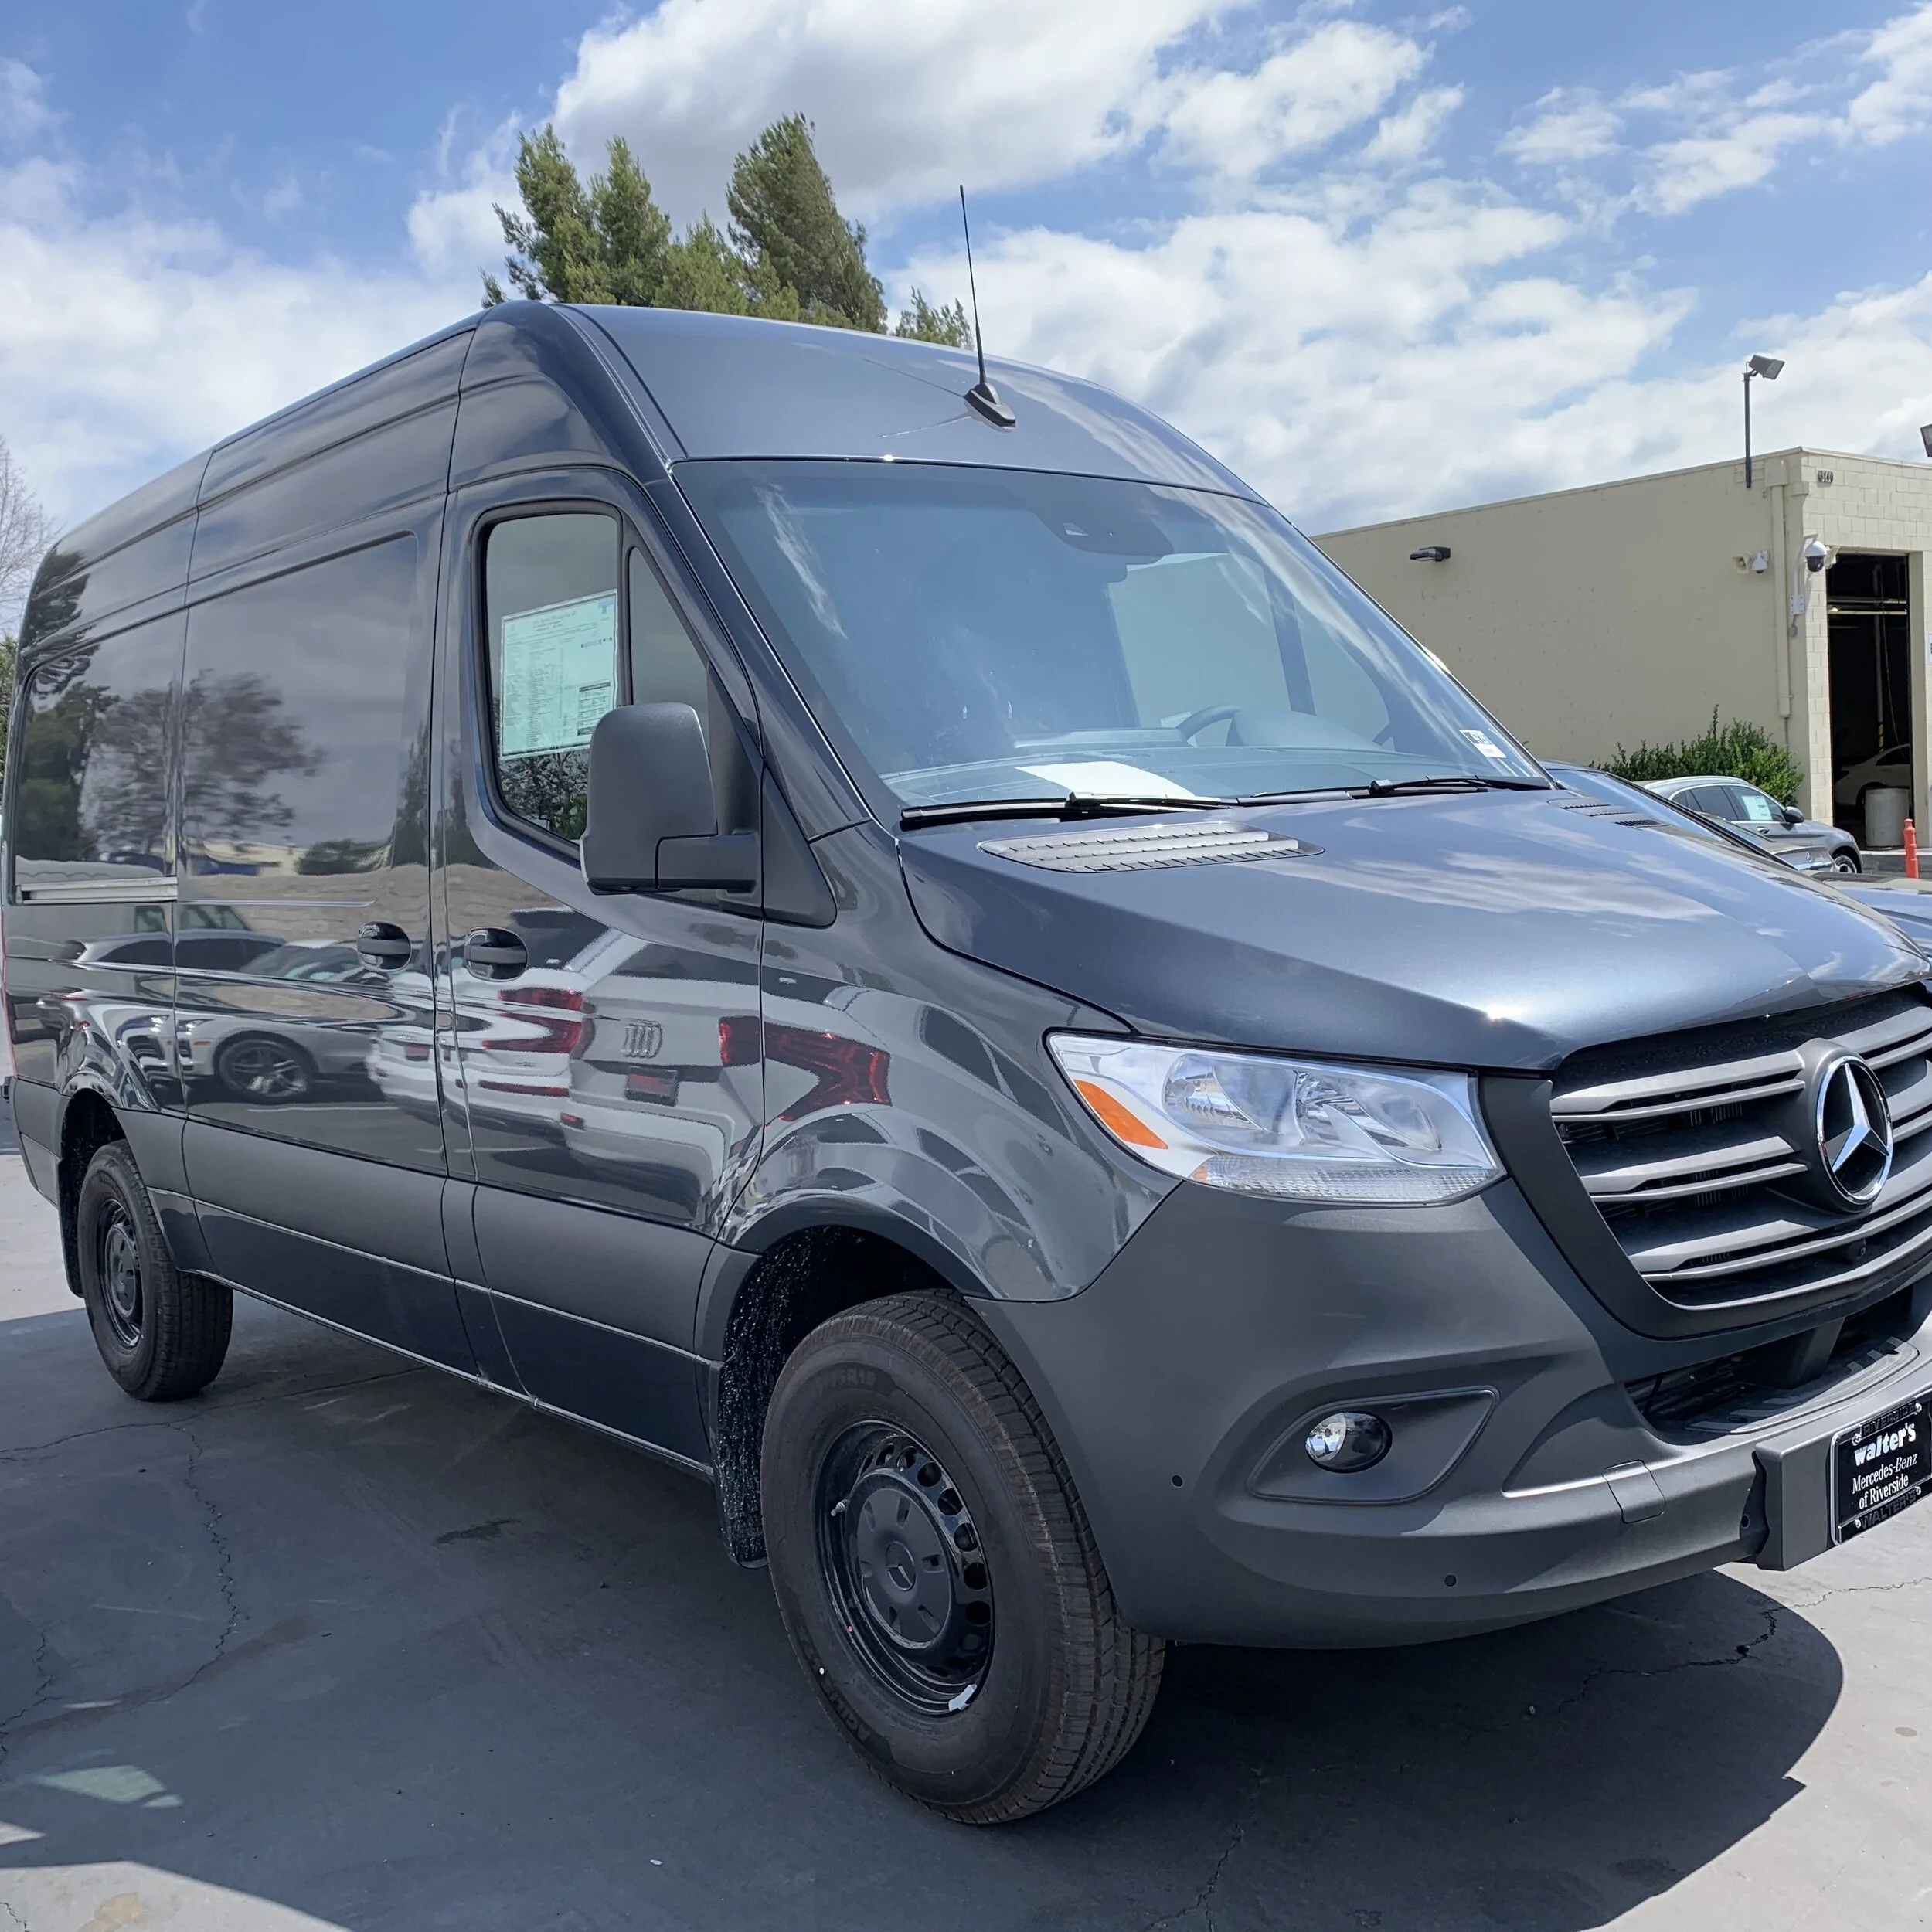
Therefore, in early 2019 I started to look into vans as I've heard they drive more like a car, plus I've seen so many amazing van builds over the past 3 years going to vanlife meetups. I looked into RAM Promaster, Ford Transit, and Mercedez-Benz Sprinter vans. First I had to decide which one was the most ideal for me. After a month of researching the pros and cons of each, the different wheelbase sizes, and talking to people who own vans, I decided to buy a MBZ Sprinter in a 144 WB, which is 20 ft long and can still legally park in a parking space.
What I didn't expect was that it would be a challenge to find a Sprinter that had all the options that made it my main choice. I wanted all the new safety features, including brake assist, lane keeping assist, cruise-control, and crosswind stabilization. I was also hoping for swivel seats, 270° opening rear doors, rear door windows, and no side windows in the cargo section. This turned into a 4 months search calling a lot of different dealerships throughout California.
In the meantime, I sold my RV for a great price in May 2019. That’s the money I put aside towards my van build!!
IF I WERE A CARPENTER
I started researching van builders that would take my vision and make it a reality. I learned some charge way too much, others only worked with certain materials, one didn't want to deal with diesel heater, another only used pre-made modular pieces, some only had stock builds, and others just weren’t on the same page as me during our discussions.
Then I heard about Johnson Custom Van Solutions from my vanlife friend Stavros. I was instantly impressed with the amazing craftsmanship I saw online. EJ is in high demand due to his experience and quality of work, so he gets to choose the clients he wants to work with. We bonded fairly quickly during our conversation and I was really impressed with his work ethic. EJ uses an electrician to do all the wiring, he custom builds all the cabinetry using bamboo, and he guarantees his work for two years! I knew I found the right person for the job and was stoked he decided to take me on as a client. There was one catch, EJ was booked up until Spring 2020! But since I still needed to find a Sprinter, I decided to reserve my spot with a deposit.
EJ put me in touch with Isaid at Walter's Mercedes-Benz of Riverside who just happened to have the Sprinter of my dreams free up. Not only did it have all my must-have options, it also had my would-like-to-have’s, and even better, it wasn't arctic white but tenorite grey metallic. This Sprinter was made in Düsseldorf, only had 13 miles on it, and was going to arrive in Riverside right before my birthday — as if the van was meant for me! I bought the Sprinter without seeing it in person, which might be the craziest thing I’ve ever done!
My brand new Sprinter was delivered to JCVS by Isaid from Walter's in early July 2019, where it was waiting for its build slot. I found out during the summer that I got bumped up to January 2020 start due to another client cancelling, which was great for me! I finally flew down San Diego to meet EJ and see my van in person in late October, which was an amazing experience. EJ has an awesome garage and work space with samples of all the materials he likes to use and we picked out a great color scheme for my build. I'm so glad I choose the right builder to make my dream van a reality!
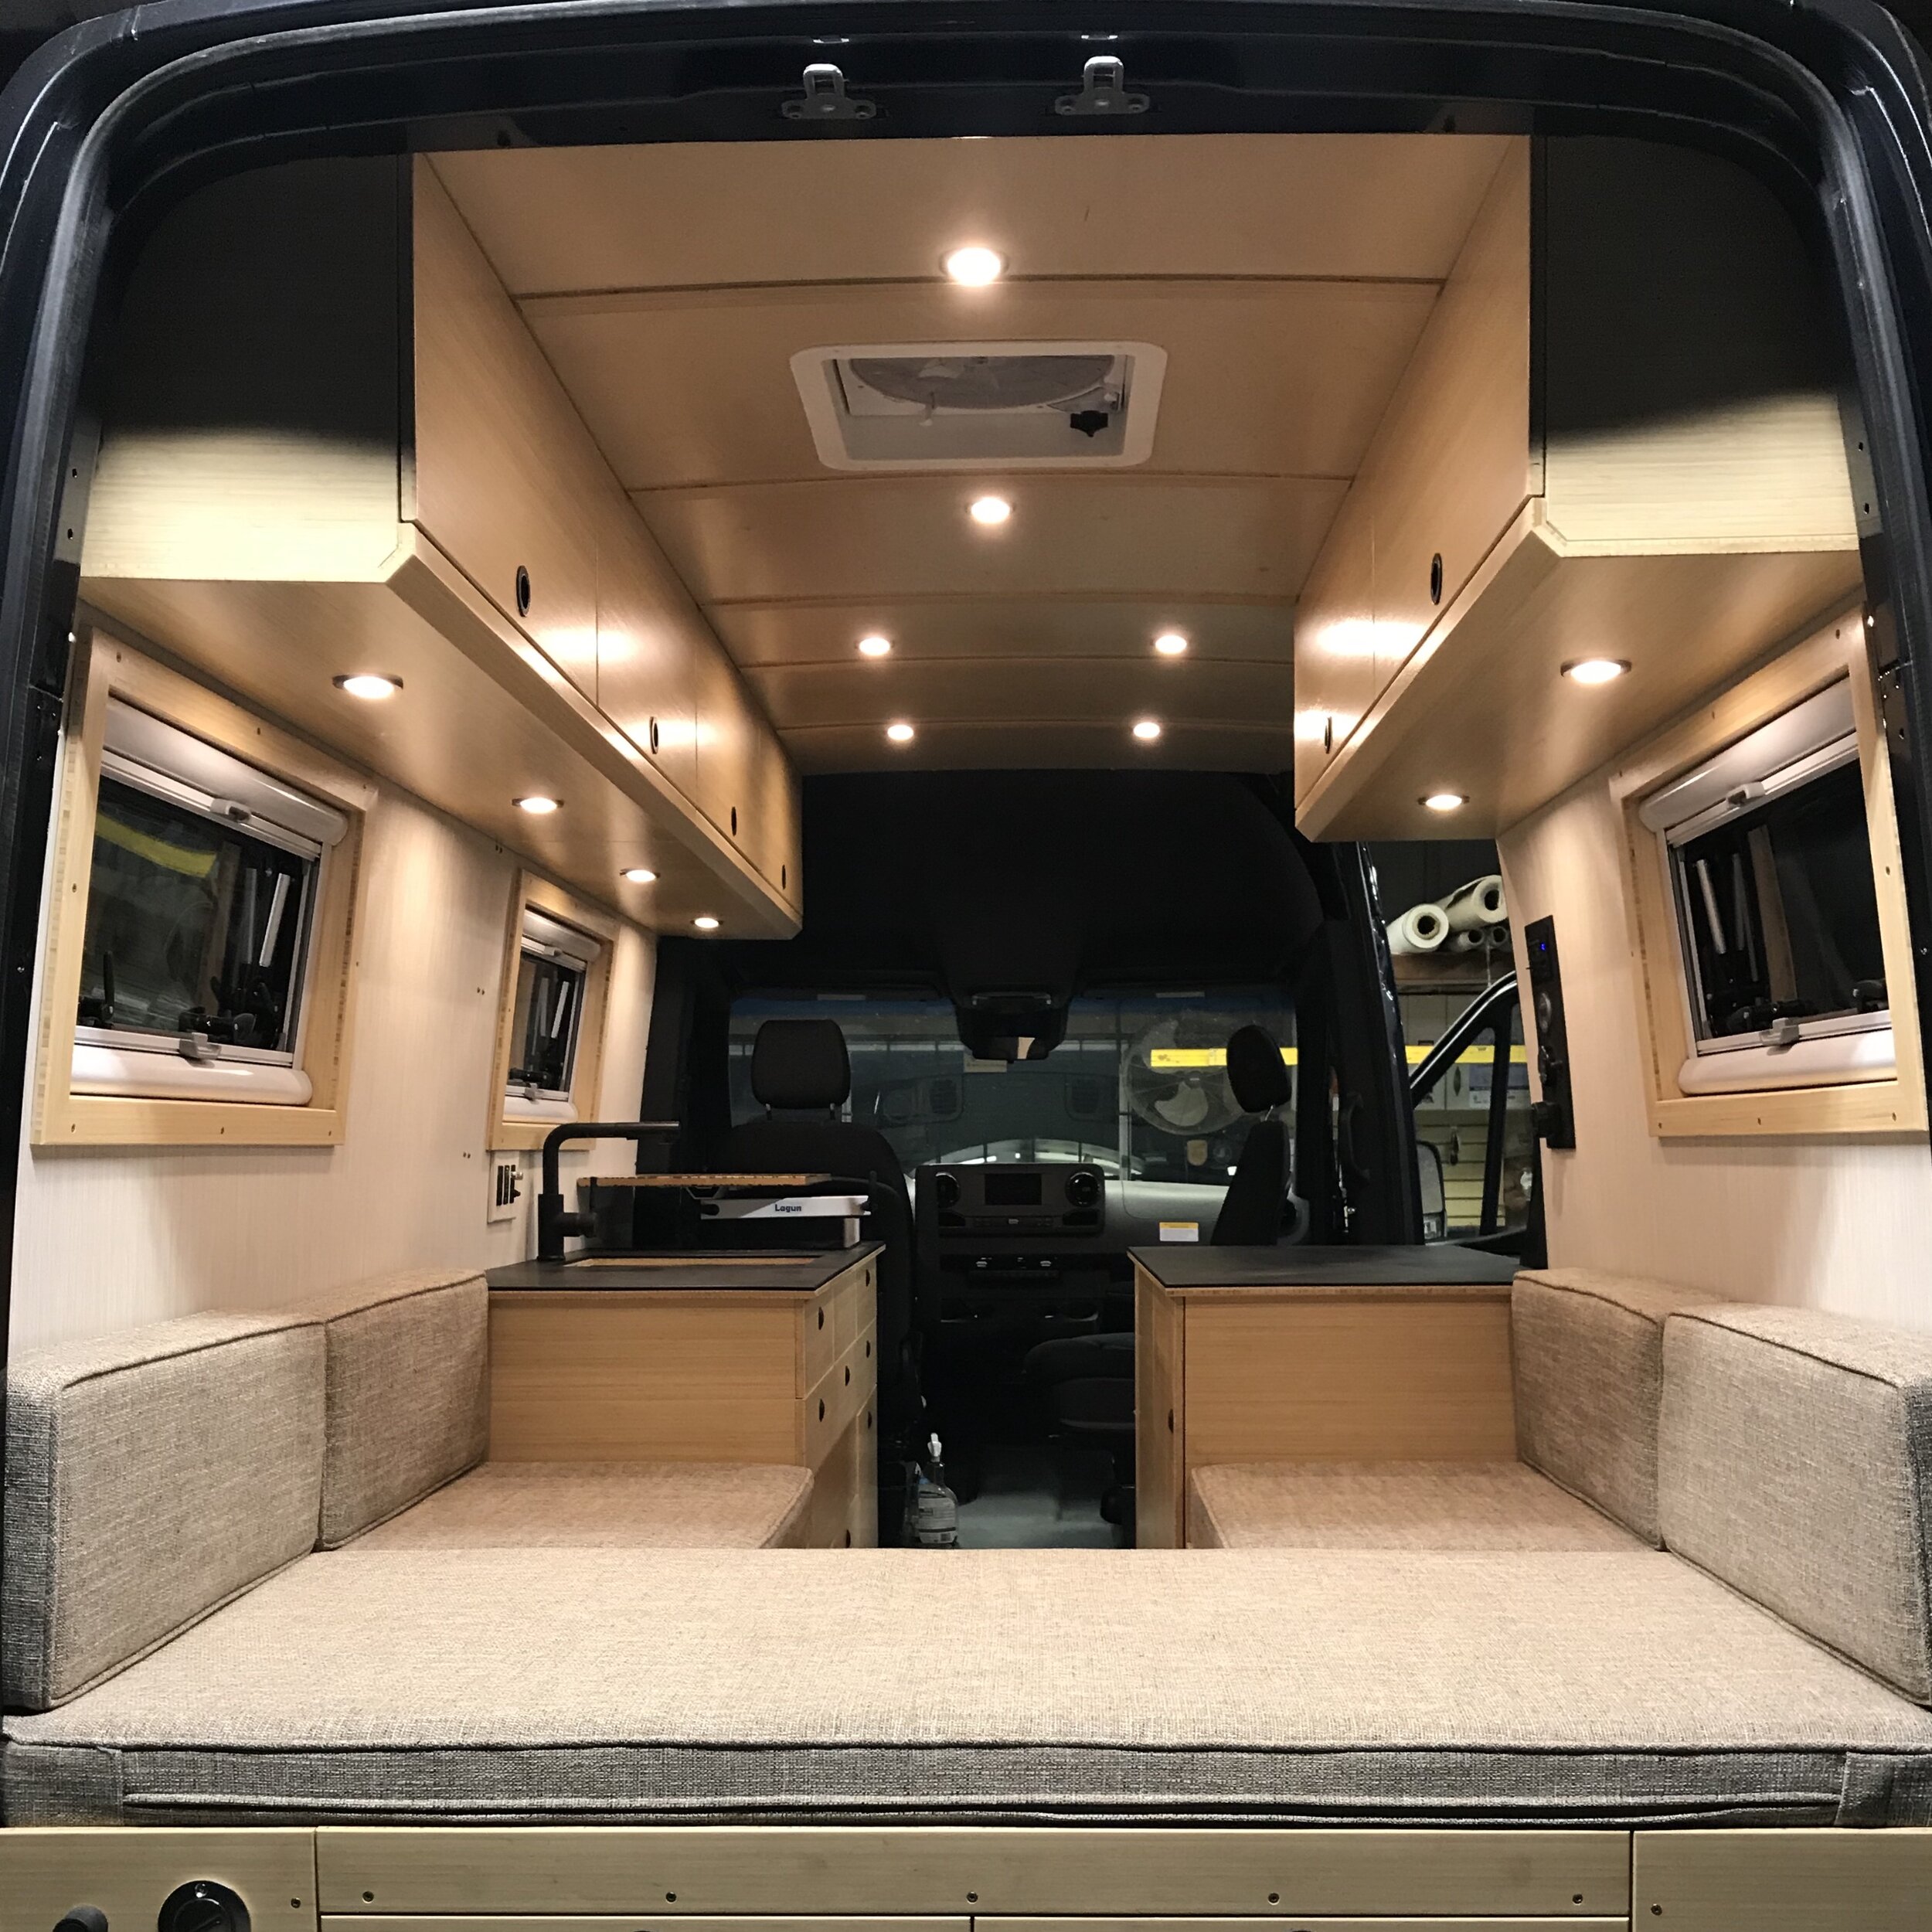
BUILD ME UP BUTTERCUP
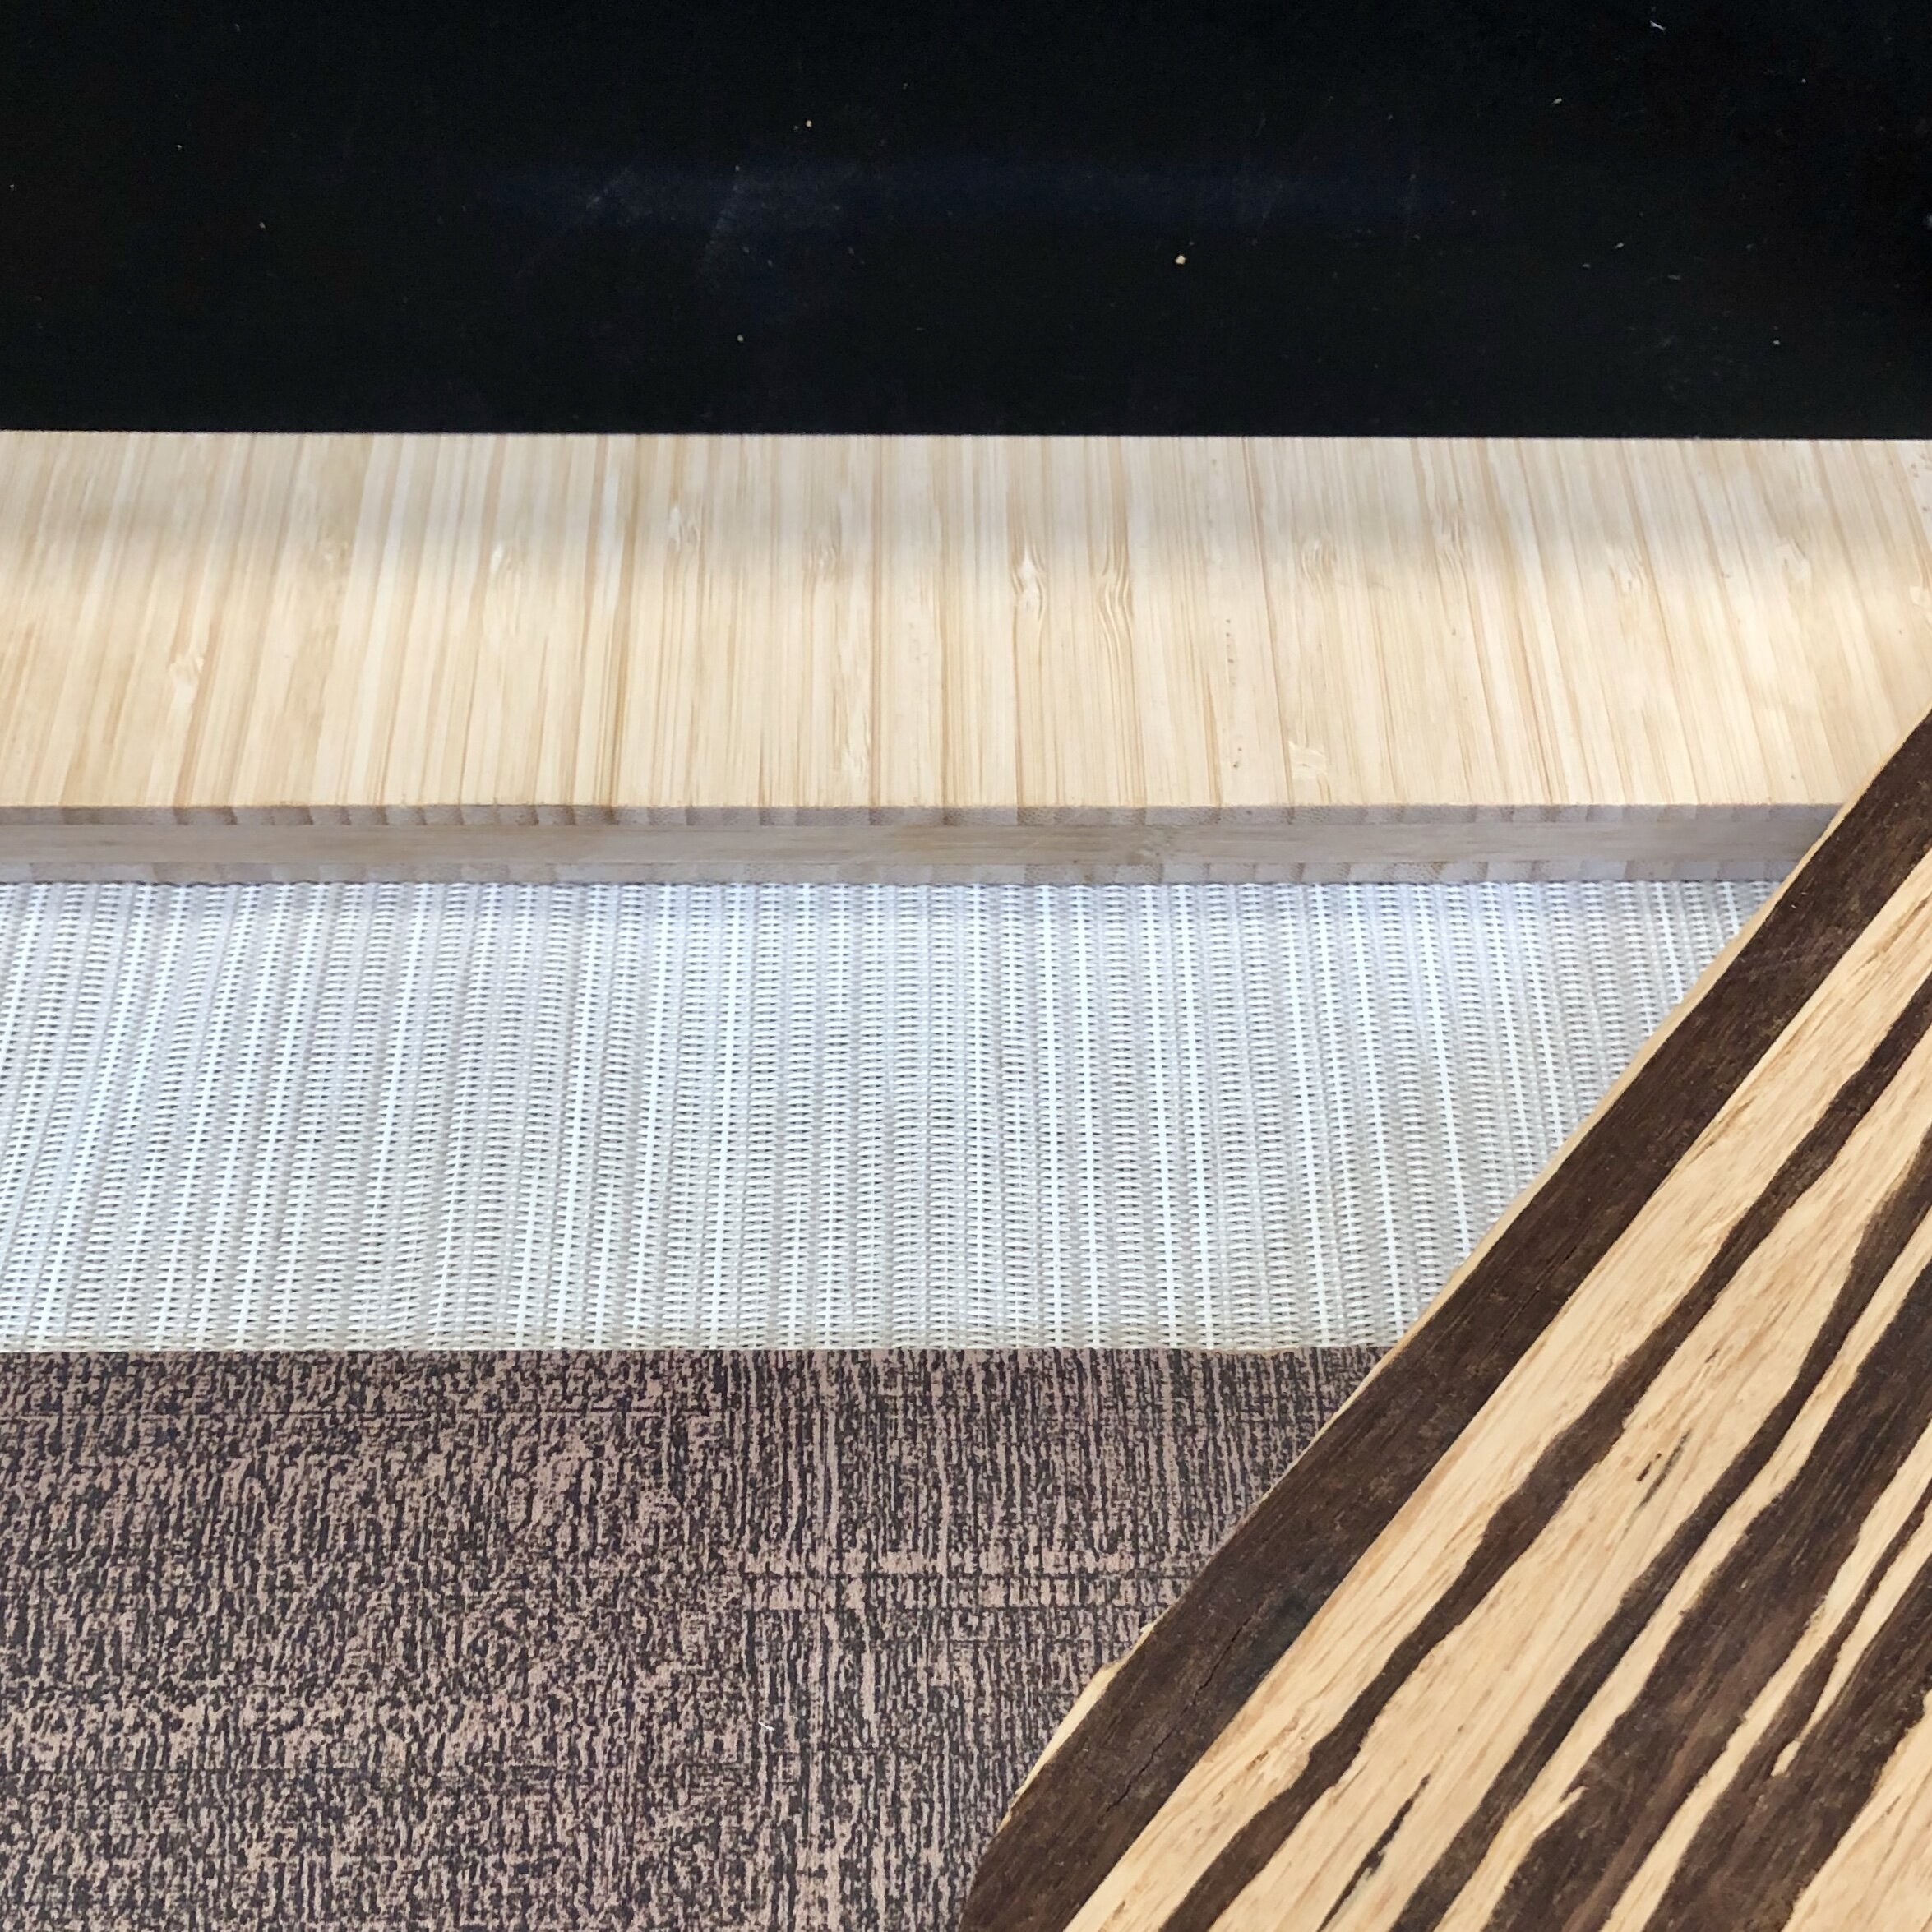
I wanted to get as close to a black and white feeling as I could while keeping an elegant and natural wood look. I decided on Cali Bamboo natural plywood for my cabinets, Baltic birch plywood for my ceiling, vinyl mesh in metallica white for my walls, Richlite countertops in black, and Cali Bamboo cork flooring.
The vinyl is a mesh fabric made from 100% vinyl-coated polyester, which is super strong and durable. It is coated with microbial protection and is virtually maintenance-free; you just wipe it down and it's almost impossible to scratch or tear. Richlite is water-resistant, sanitary, has low moisture absorption, heat and fire resistant, extraordinarily dense and durable, and has a natural appeal due to its paper construction. Cork is great because it is a quiet, comfortable, and durable floor, plus it's manufactured from reclaimed material from the wine bottling industry.
Last but not least, I went with a beautiful "zebrawood" for my table. Smith & Fong make Plyboo bamboo dimensional lumber in various grains and their neopolitan variety has a zebra feel to it, and I love everything zebra! I figured this would be a perfect accent piece for my van, tying together all the natural wood, the cork floor, and black countertops!

MUST I PAINT YOU A PICTURE
My van build layout was a big decision. I have seen so many awesome van builds and already had an idea of how I use small space from the RV I owned. Originally I thought I wanted a platform full-size bed with a kitchen galley, two seats opposite one another with pull-out table from under bed, and one row of overhead cabinets on the drivers side from front to back. But as I started researching vanbuilders, I started to think more about all the space under the platform bed that you can only get to from the back of the vehicle and wondered whether that was really the right fit for me. I realized that I don't really need that huge space under the platform bed for a bike and other sporting gear. Instead, I would benefit more from having more living space inside the van. That's how my vision for my current layout developed.
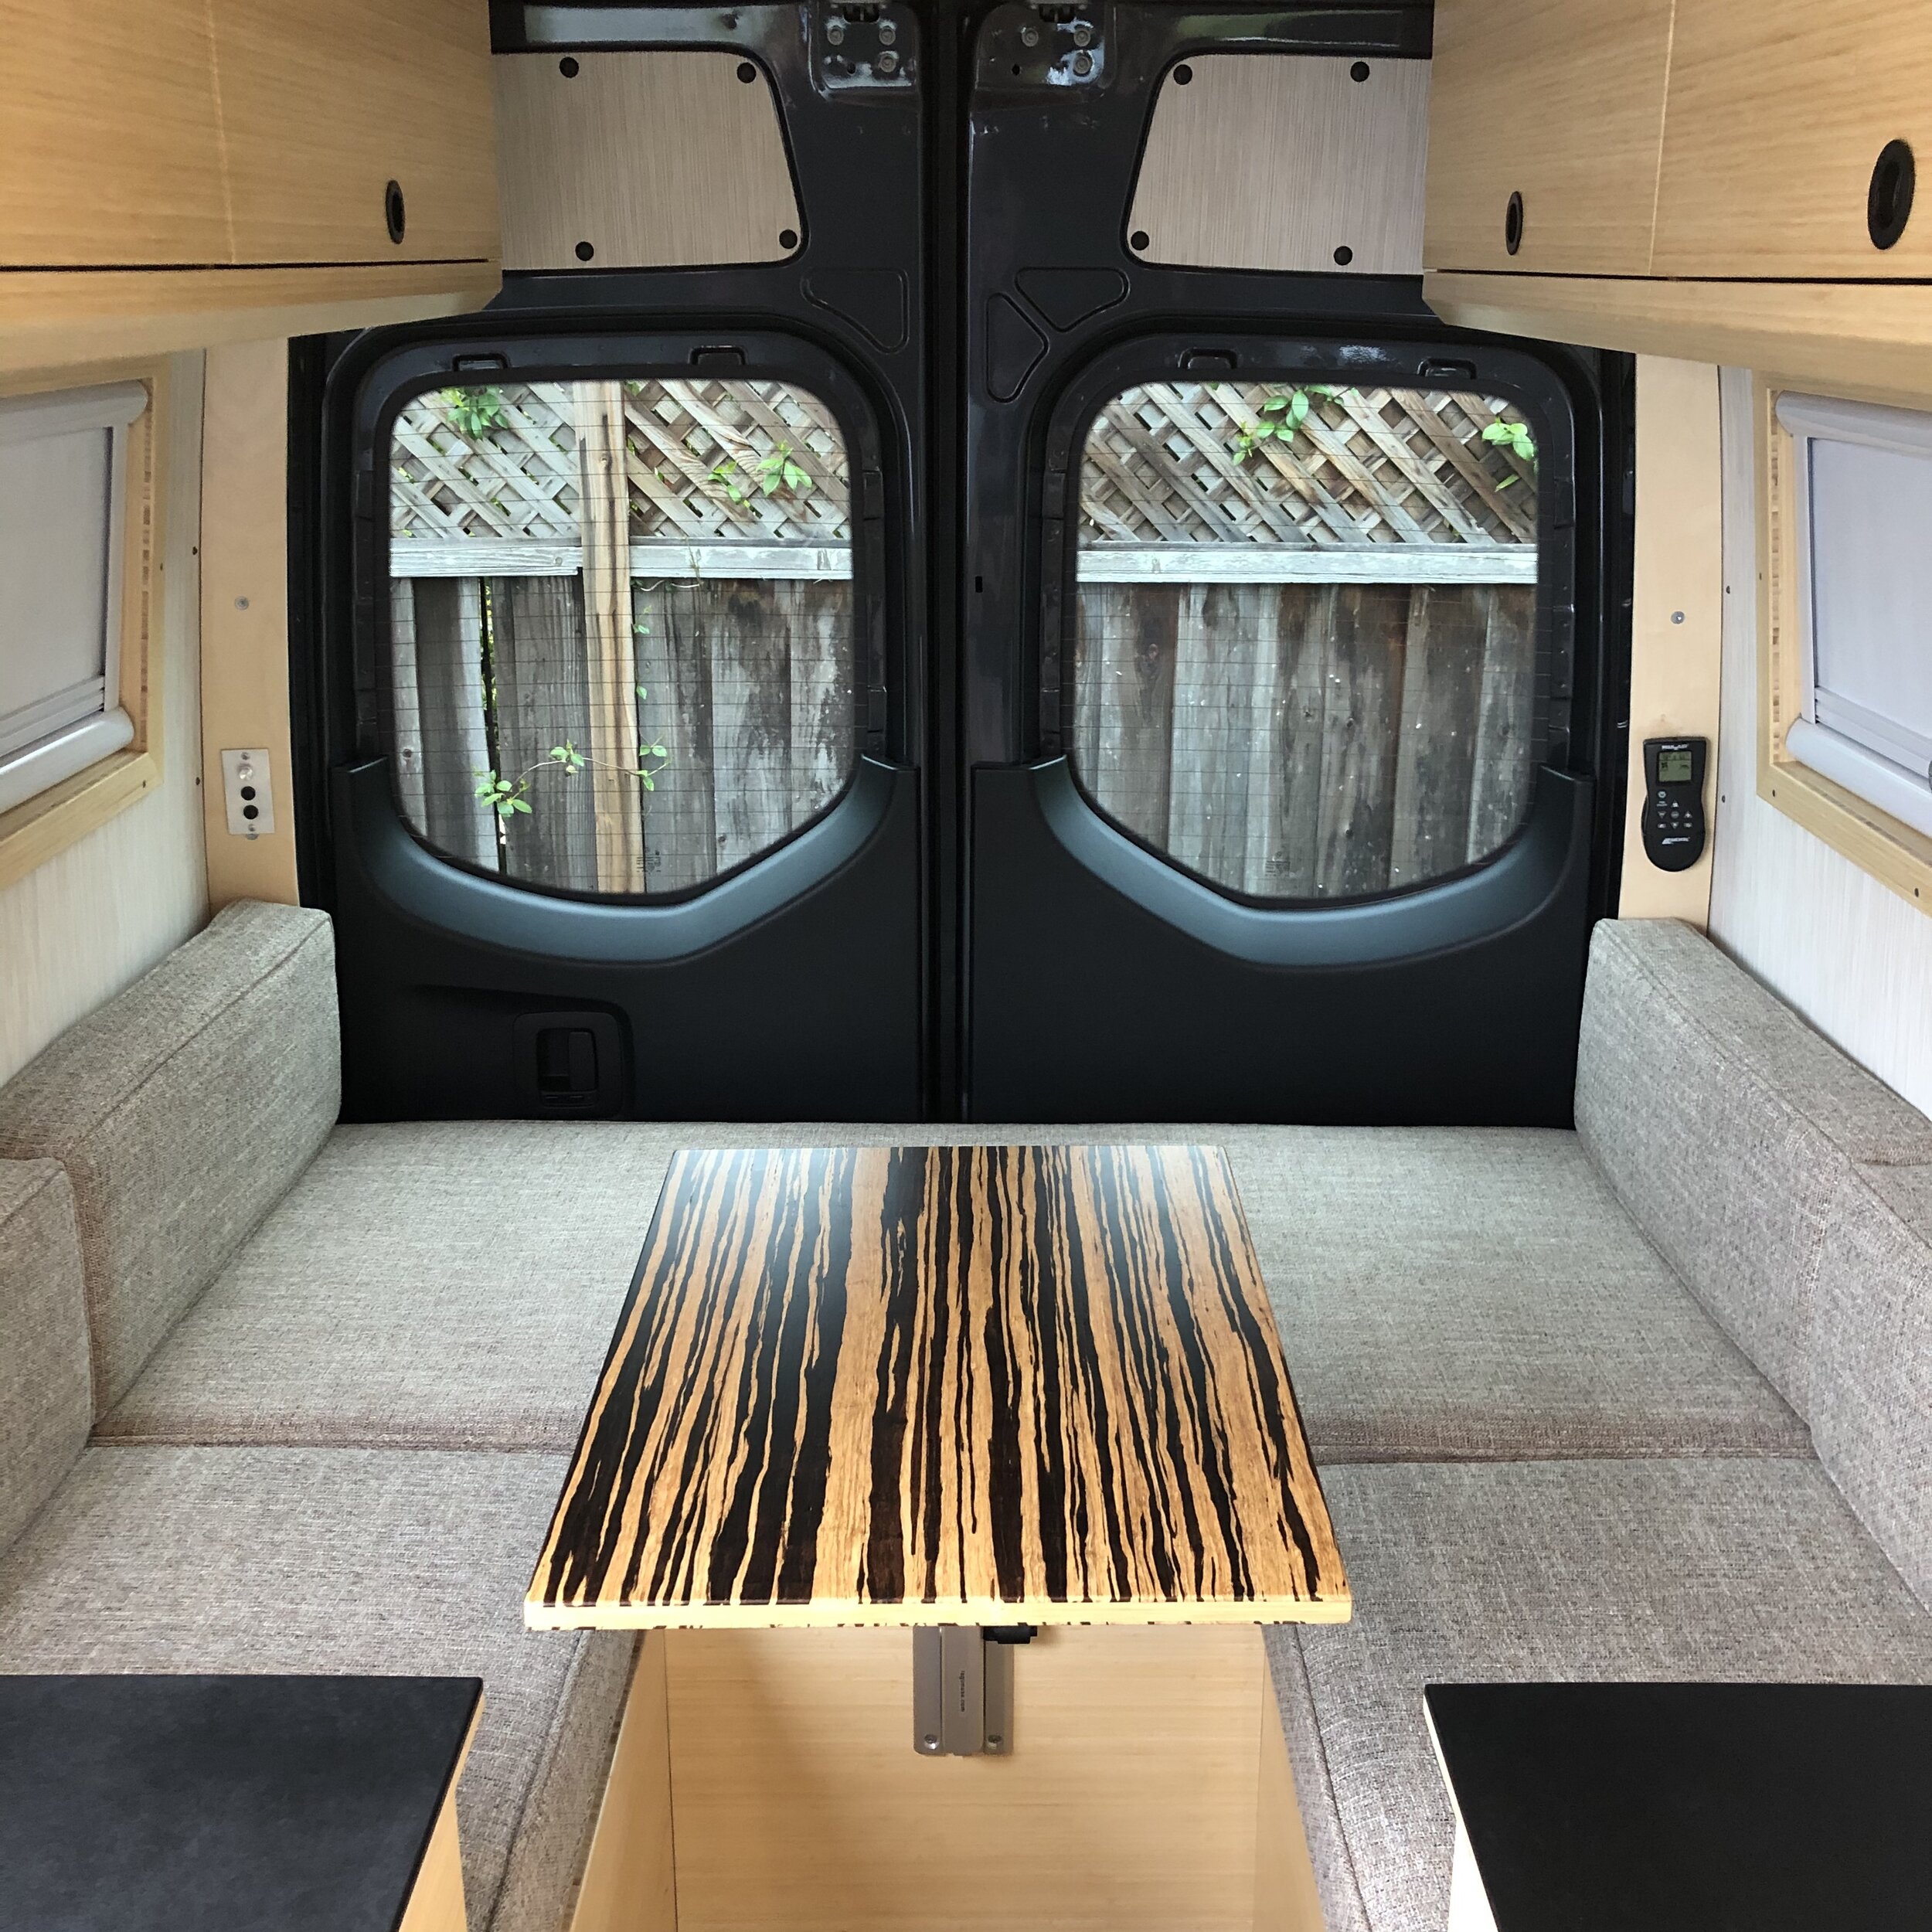
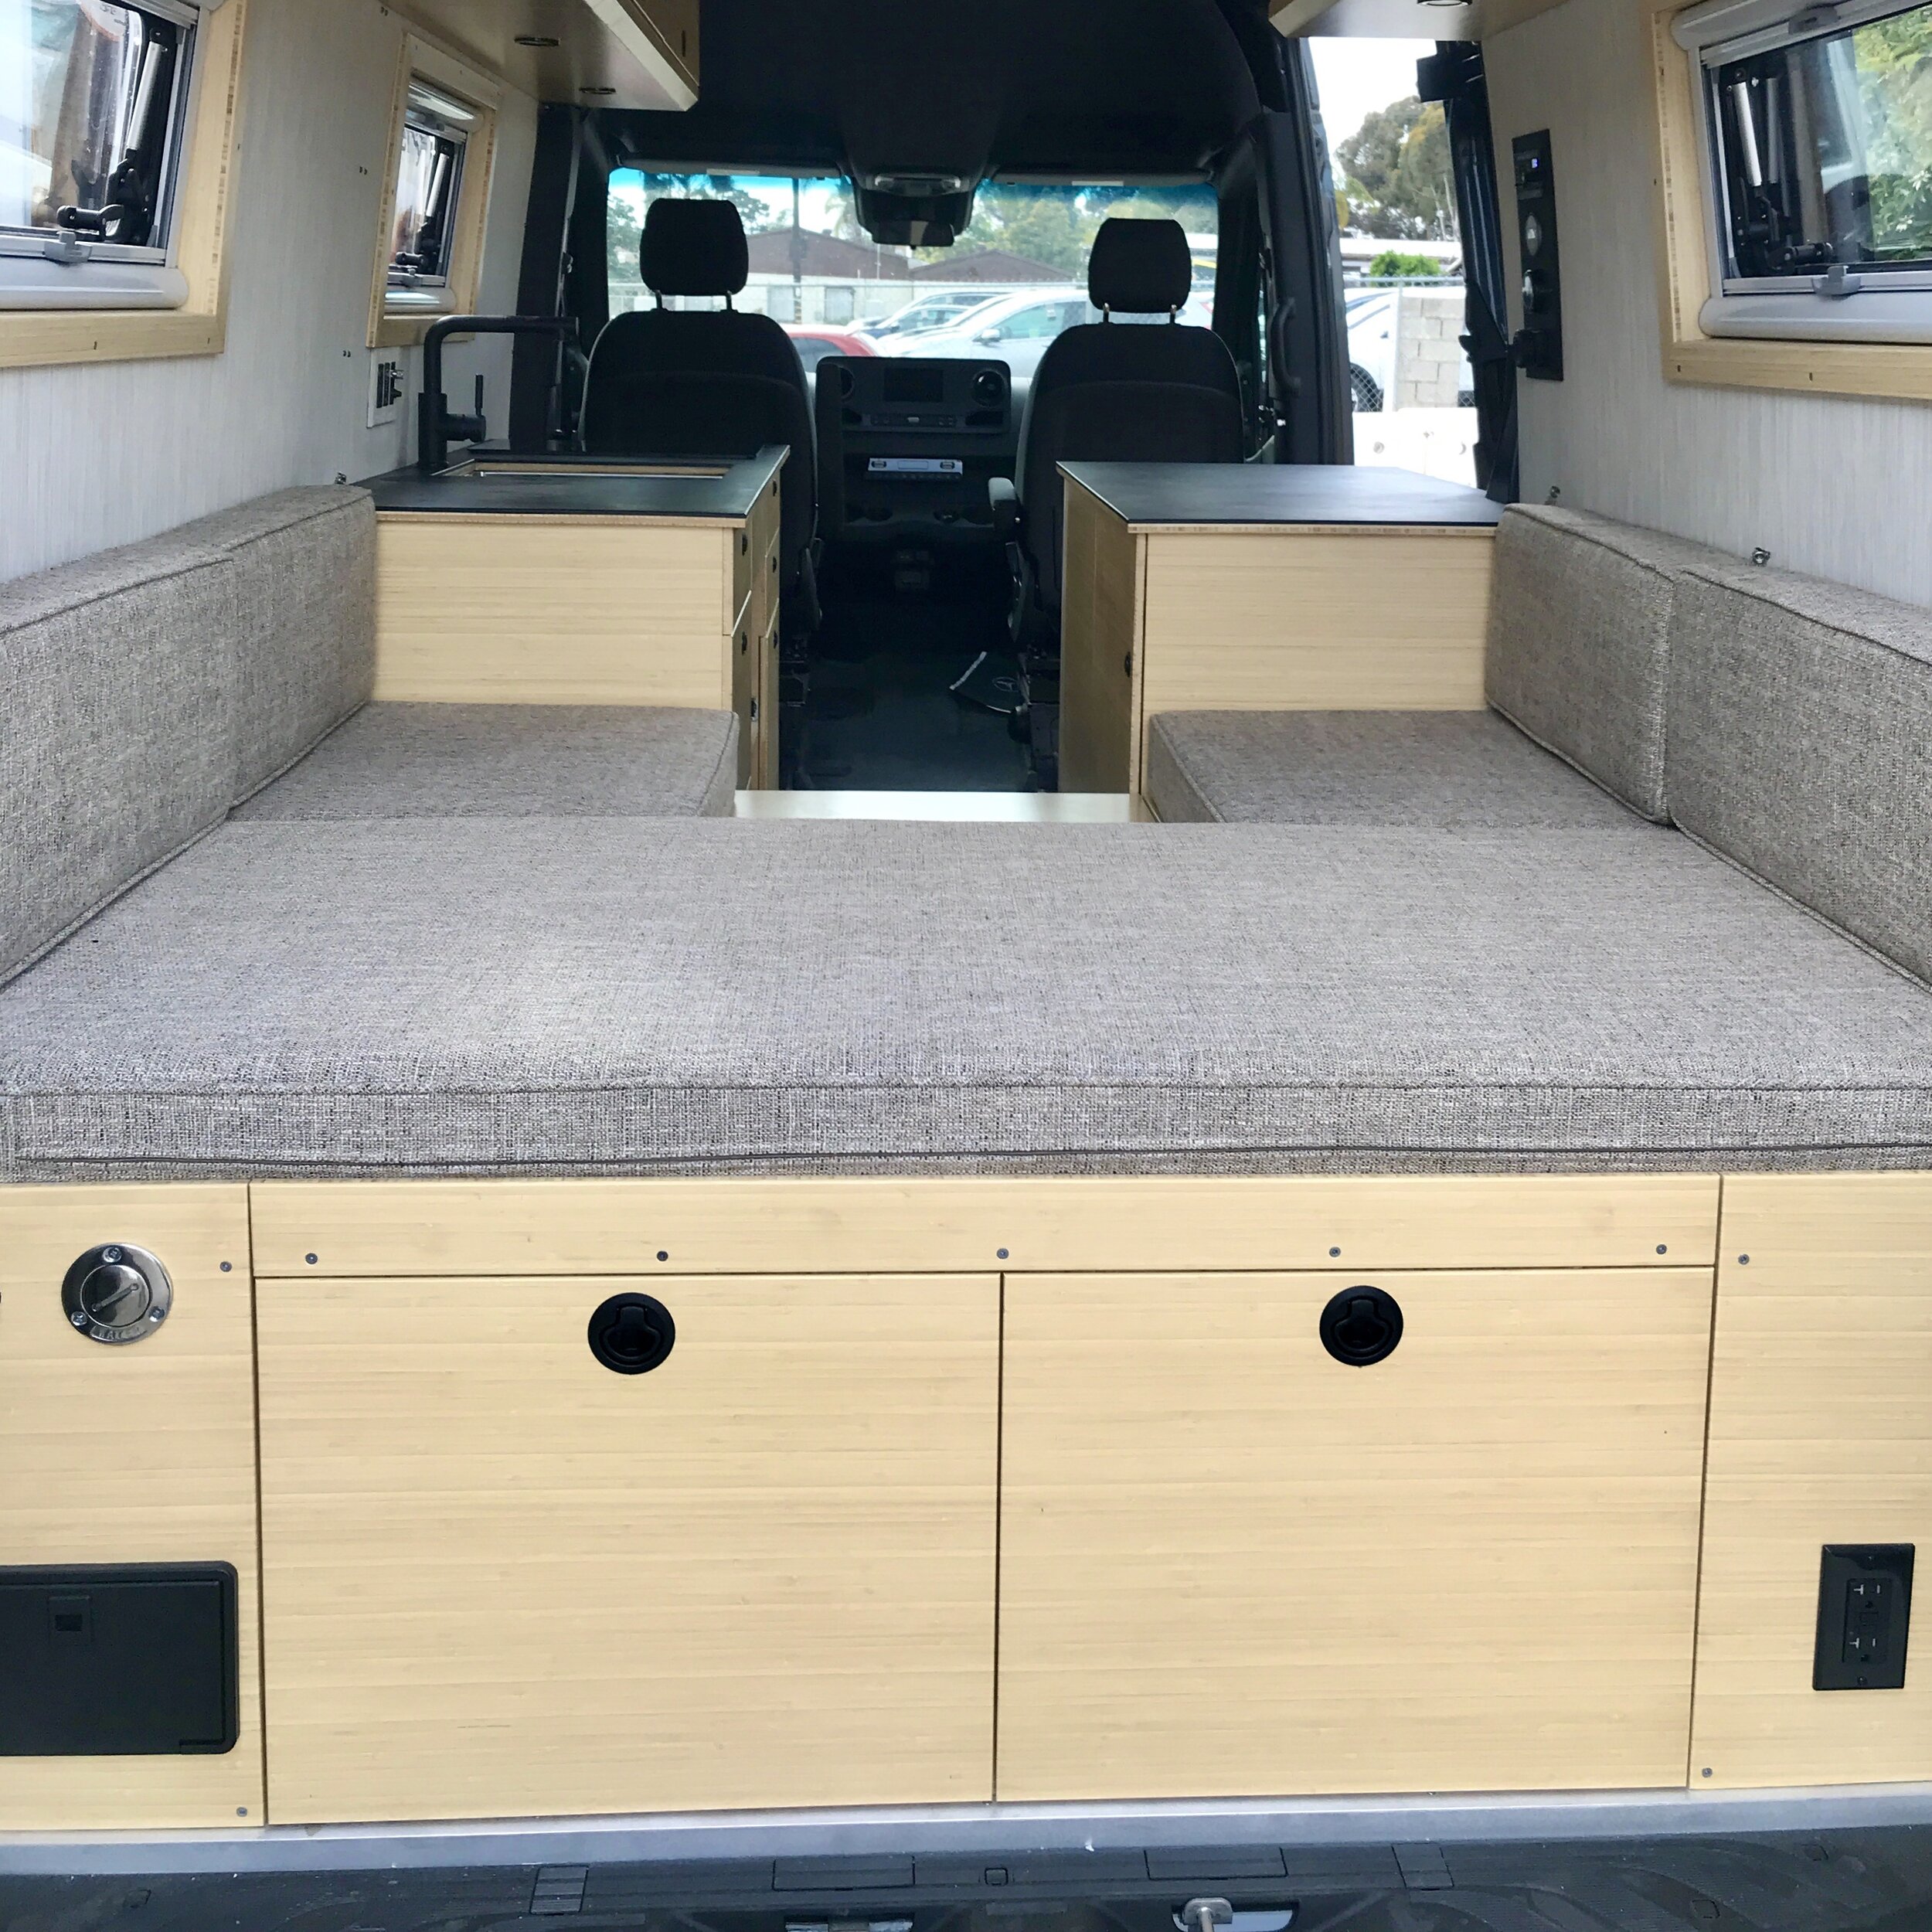
I decided on a u-shaped bed/dining area at the back of the van. I like to socialize and often had 3-4 people in my RV, so having an area where multiple people can hang out was something that really appeals to me. Plus I had to accept that I'm currently single, so why focus on a permanent full-size bed when right now I'm traveling solo. The u-shaped bed makes it so that I can use the back part to sleep, but if I do have a person with me, I just fill in the "u" with a wood panel and cushion and it becomes a full-size bed. It's more practical, more versatile, and gives me more space inside the van.
I also decided that I want a good size refrigerator/freezer, a kitchen galley with a recessed sink big enough to wash my hair in, a two-burner stove, and a toilet. I'm really happy with the layout I came up with, plus EJ had some valuable input to have overhead cabinets on both sides to distribute van weight, and a table that can attach in the back at the u-shaped bed, and in the front for the swivel seats.
I hope my hand-drawing gives you an idea of the layout; sadly I suck at 3D modeling apps.

HIT THE FLOOR
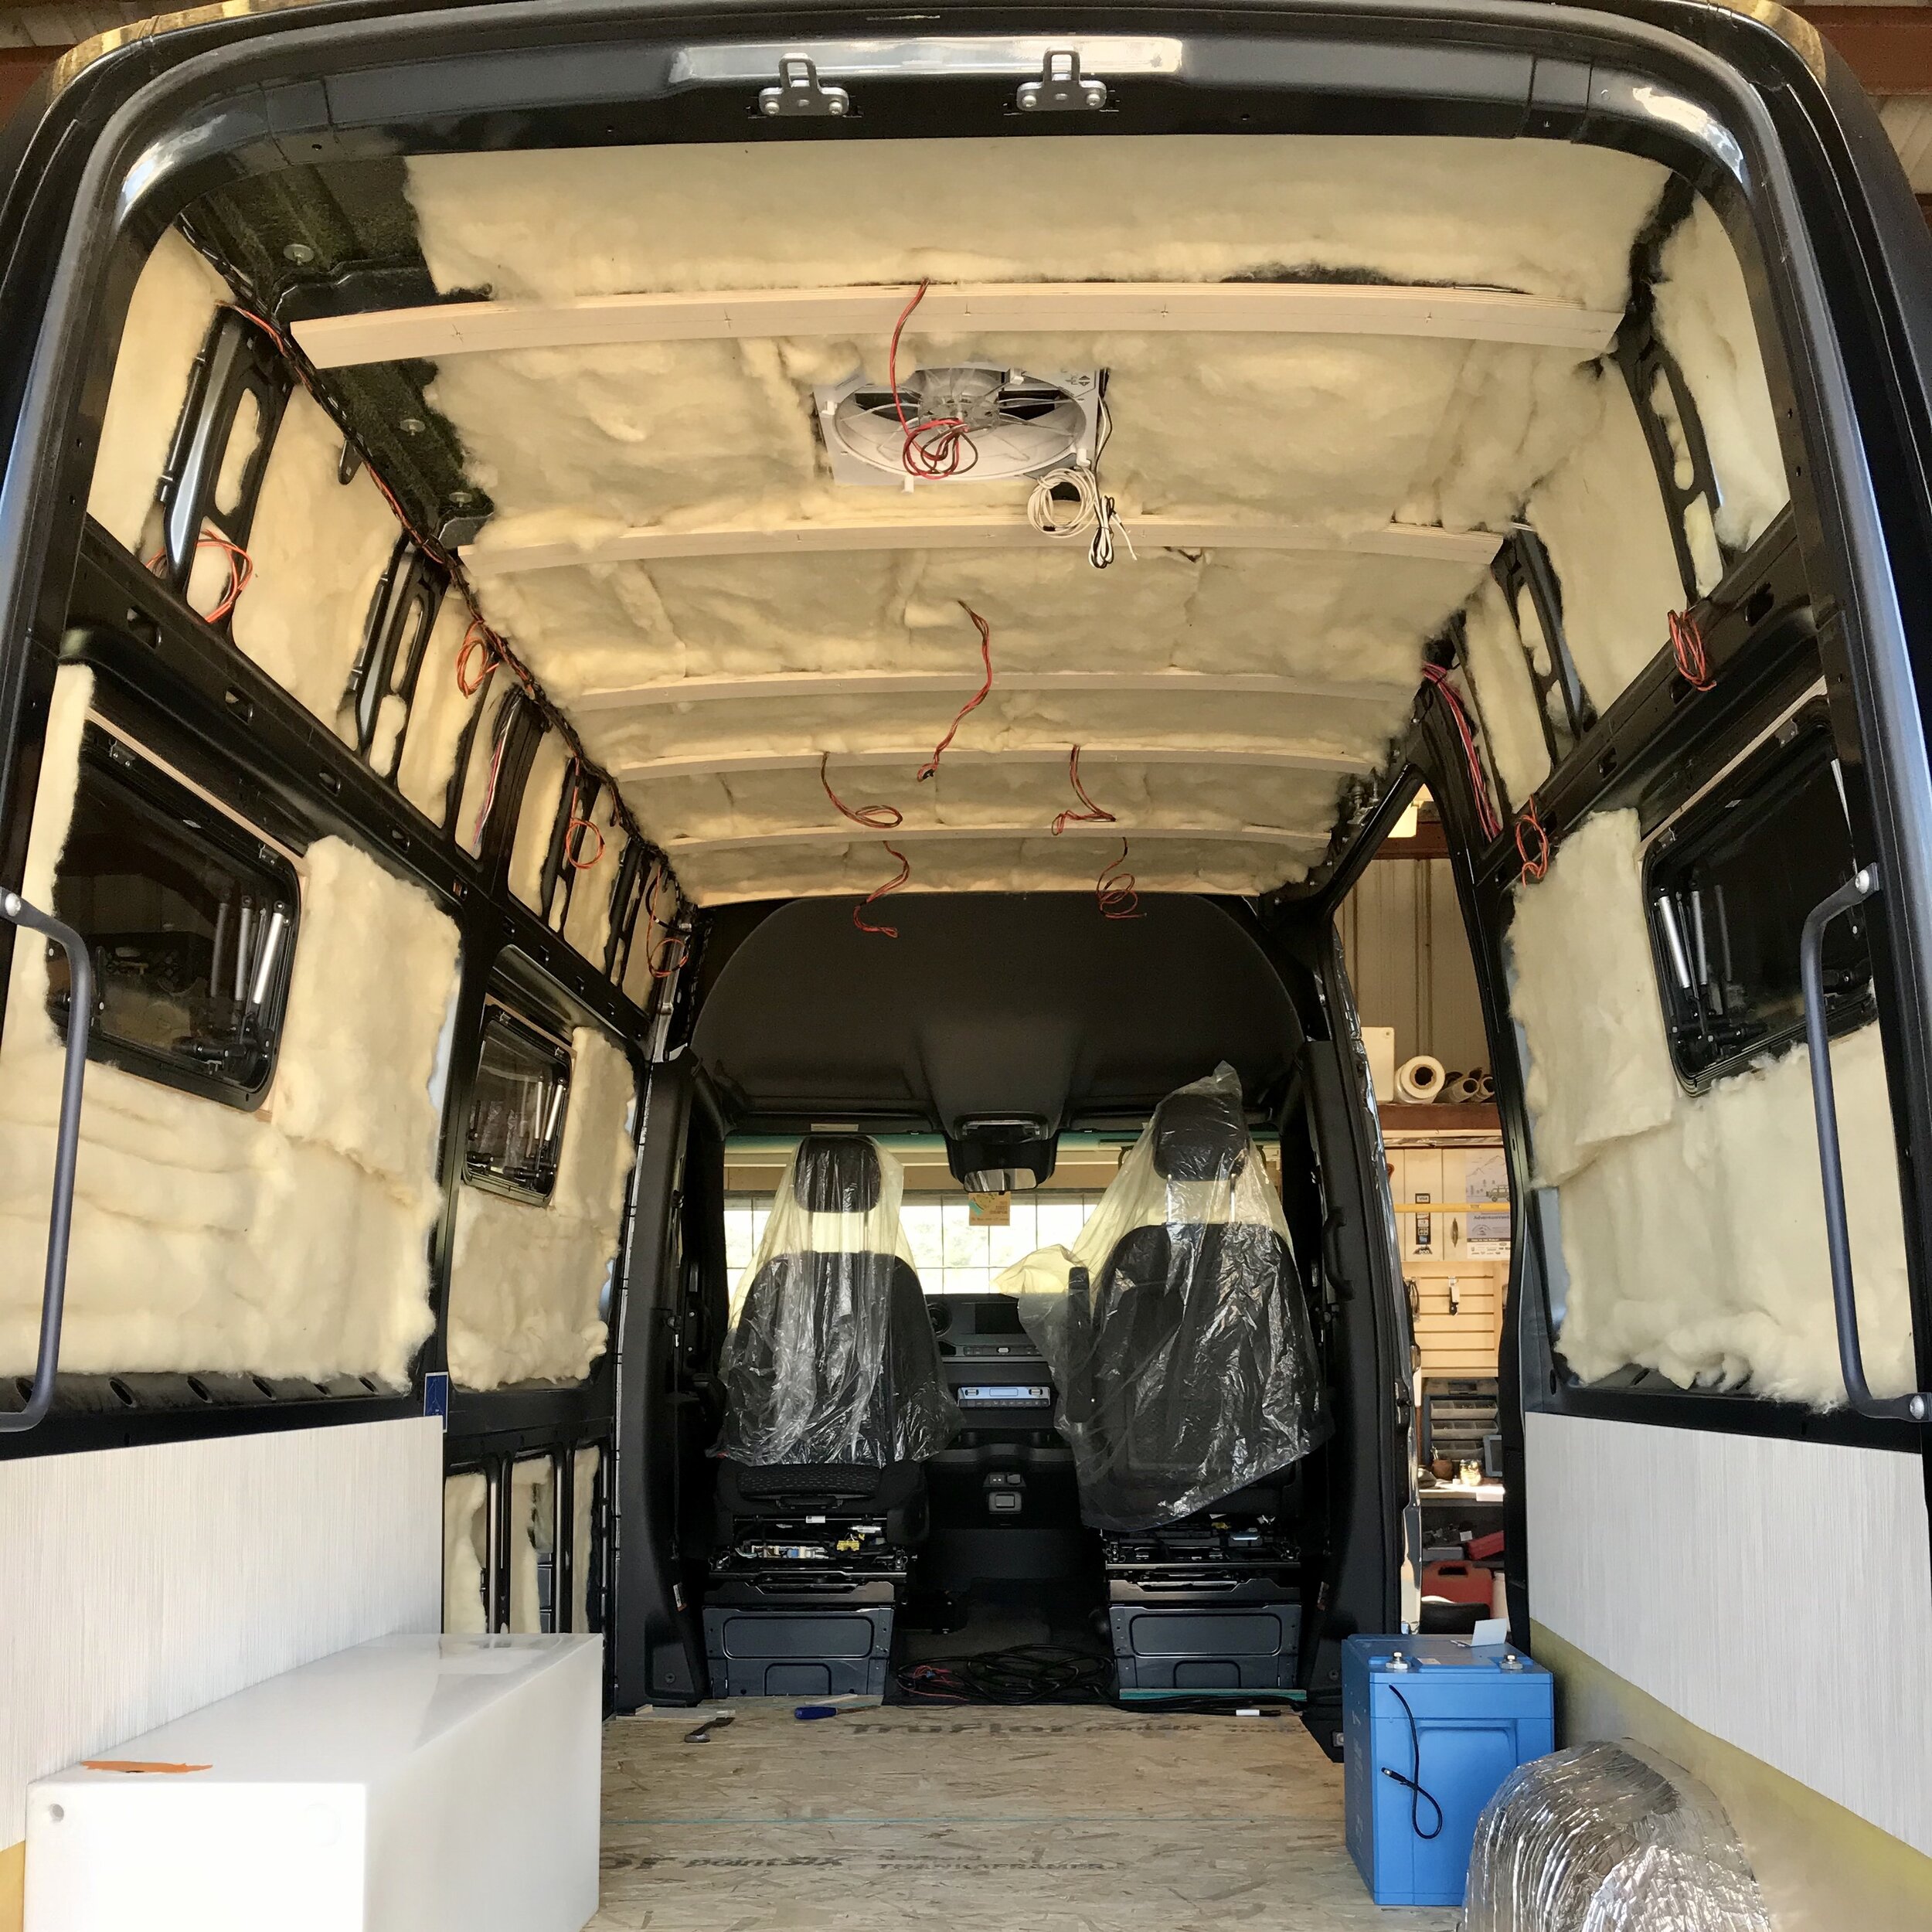
My van build started with installing 80mil floor insulation and a 3/4” T&G sub-floor.
For insulation, my van builder used FatMat Rattle Trap Super Stick Sound Deadener. Rattle Trap is 3 times more effective than leading sound deadeners and stops all rattles and vibrations dead in their tracks. It also keeps heat in when it’s cold out and keeps cold in when it’s hot out.
Norbord TruFlor is a high-quality commodity tongue and groove sub-floor that offers real value, strength, and durability, plus it’s T&G profile is designed for fast and easy installation.
From The Window To The Wall
Next in my van build was the wall and ceiling insulation using Havelock Wool and the installation of three Tern Overland 300x700mm windows in 24-34mm thickness, one on each side of the bed in the back and one in the kitchen galley.
Havelock Wool is a natural high-performance sheep's wool insulation that's perfect for vanlife. Wool improves indoor air quality since it doesn’t off-gas harmful chemicals, the fibers serve as an air filter, the amino acids bond with harmful chemicals on a molecular level, and it is hypo-allergenic. Wool is a keratin and will not support the growth of mold or mildew, it manages moisture by absorbing and releasing it against 65% relative humidity, and prevents condensation by generating heat from energy. Wool also absorbs 90-95% of airborne sound, and due to its fibrous nature, it can reduce airborne sound, surface noise, and sound transmissions all at the same time.
Tern Overland’s Arctic Tern windows can be set at 10 and 35 degrees open via telescopic struts, feature a semi-lock position that allows air in during stormy conditions, and feature UV resistant double pane acrylic glazing. Unlike slider windows, these units allow the full size of the window to be open for maximum ventilation. A separate interior cover panel contains the retractable fine mesh insect screen on the top and a blackout blind with reflective exterior on the bottom, which can be used separately or together for infinite combinations of privacy and air. The blind also creates a second dead air space for maximum thermal efficiency in very cold conditions. These windows weigh barely 60% of a similarly sized glass window, have a heavy-duty powder coated aluminum frame, feature push-button locking handles, have high quality rubber seals, and are easy to install.

DOWN BY THE WATER
I knew I wanted at least a 20 gallon water tank based on my water use in the RV, so I was happy to learn that Agile Off-Road makes a cool 22-Gallon Universal Water Tank that snuggly fits around the wheel tub and against the wall, utilizing the wasted space around the rear wheel well, and fitting perfectly under the driver side of my bed. There's even room next to it for additional cabinet space!
The water tank not only supplies water to my kitchen sink, but also has an outdoor shower running from it out the back doors. I plan to get the shower curtain from Quest Overland so I can shower between the open back doors in private.
My van builder EJ also installed an Indel Webasto Marine Isotemp 4 gallon 110 volt water heater that only draws 750 watts. It fits perfectly in my kitchen galley in the cabinet closest to water tank. Last but not least, I have a 15 gallon gray tank mounted underneath my van with a Solenoid dump switch.

ELECTRIC FEEL
One of the reasons I went with JCVS is because EJ uses an electrician to do all the wiring to ensure it's done right. I appreciate that thoroughness and professionalism so I never have to worry about something not being hooked up right or not having enough power to run everything in the van.
For my battery and electrical system, EJ went with Victron Energy products. Victron just released their new Lithium 12.8V/300Ah Smart Battery so we decided to use that instead of three 100Ah Battle Born ones. The full electrical package we went with from Victron also included a BMV-712 Smart Battery Monitor, 120V VE.Bus BMS, Digital Multi Control 200/200A, MultiPlus Compact 12/2000/80-50 Inverter/Charger, Cyrix-Li-ct Battery Combiner, and a SmartSolar MPPT 100/30 Charge Controller.
As you can see, we went with high quality products that all work together seamlessly. I wanted something reliable and efficient that was easy to use and with the smart feature, I can regulate and monitor everything with VictronConnect’s phone app.
Since all the equipment is stored under the passenger side of my bed, EJ made it accessible just by lifting the bed cushion and wood panels. It's very well thought out in case something needs to be fixed or replaced.

EMPTY SPACES
Seeing how my van came together from afar was a surreal experience. Three months of anticipation and only photos to satisfy my curiosity. EJ was nice enough to send me pictures of the van build in all stages as it progressed, which really gave me an idea of how everything was coming together.
This is the start of my kitchen galley. You can see the overall layout, where the toilet ended up going, where the water heater is, and where the kitchen drawers are being installed.

KNOCK ON WOOD
My cabinets are beautiful! EJ is an amazing woodworker who builds incredibly functional and visually stunning cabinetry. I went with a natural plywood bamboo from CaliBamboo with gorgeous Richlite black countertops.
I have upper cabinets lined from front to back on the drivers side, as well as on the passenger side over the bed. These upper cabinets are not as deep as the lower cabinetry so you don't hit your head on them while cooking or using the sink. They also have rounded edges on the bottom so there's no sharp corners to injure yourself on, as well as doors that hinge up and lock into place to stay open, plus they're lined with carpet which is a nice bonus touch. The lower cabinets have soft-close drawer slides with black plastic marine latches that are really sturdy and effective. I even have a huge storage cabinet behind the refrigerator!
The van's interior has some nice finishing touches. There’s a nice Baltic Birch plywood ceiling that matches the CaliBamboo cabinetry perfectly and the seams are covered with natural bamboo strips. The Tern Overland windows are framed beautifully with bamboo, which looks great with the 'metallica white' vinyl mesh fabric walls. The vinyl is super durable, can’t be scratched, and is easy to clean.

ALL AROUND THE KITCHEN
My kitchen galley is stunning and practical, thanks to EJ!
I went with a medium-sized (17x19x9”), under-mount stainless steel sink by Torva and a modern-style Peppermint faucet that has a pull-down sprayer so that I had plenty of space to wash dishes and wash my hair. The sink has a matching Richlite/Bamboo cover that also serves as a cutting board and it includes a nice adjustable dish rack.
I decided not to get a microwave or oven, just needed a good stove, so EJ recommended the Empava Induction 120V, 12 inch, 2 Burner Vertical Cooktop. I just flip on the inverter and I'm ready to cook and reheat some delicious food on this lovely flat stove that integrates perfectly with the black counter, plus it’s so shiny!
TURNING TABLES
I love everything zebra, therefore, zebra print dominates my bedroom at home. I originally wanted a black and white van theme, but I also love the craftsmanship and natural look of wood, which is why I went with the black and tan color scheme instead. That's when EJ introduced me to the most gorgeous wood I've ever seen — zebrawood!
Once I saw it, I knew I needed a zebrawood table to tie everything together; the perfect centerpiece of the van. Smith & Fong's Plyboo bamboo in their 'neopolitan' variety was used for this wonderful table that's mounted on the Lagun table leg system. Even better, the table has two mounts in the van, one in back by the bed/dining area and one in front by the swivel seats. The zebrawood was sprayed with four coats of a water-based, semi-gloss polyurethane using an HVLP spray gun.
The Lagun Table leg system is constructed of heavy anodized aluminum and swivels 360 degrees from two different locations. It easily locks down by turning the hand locks and adjusts up and down on its mounting plate so you can adjust it right where you want it. The best part is that the Lagun arm can easily, and quickly, swing out of the way if you want to get up to grab something, so you don't have to worry about moving stuff off the table.
There's also the perfect amount of warm LED interior lighting located in the ceiling and underneath the upper cabinets. Three different knobs control the lighting so that you can choose which section of lights to utilize, and they are all dimmable, giving one many lighting options depending on their needs. More details on lighting further down.

Appliance of SCIENCE
I went with an Isotherm Drawer 130 INOX Refrigerator in a stainless steel design that has a gross internal volume of 130 liters (4.6 Cu.Ft). The main drawer-door mechanism ensures safe and large storage for food and drinks. A bottle rack and modular shelves are provided on the main counter door. Two inner drawers are available to ensure the maximum usability as well as great storage, with the top one as freezer compartment. It features easy, user-friendly access, robust drawer mechanism, adjustable bars, and an internal blue LED light. I can access the fridge easily while standing outside the sliding side door, which is perfect when I want to grab a quick drink!
EJ also added a nice little cubby hole in the sliding door side of fridge cabinet where the floor goes over the van step. This hole is perfect for storing shoes and it’s those little touches that make a big difference!
For heat, I went with the Webasto Air Top 2000 STC with SmarTemp control, which is capable of providing quick and efficient recreational vehicle engine-off heat. It has a heat output 3,100 – 7,000 BTU/h (0.9 – 2 kW), uses as little as 1 Gallon (3.8 l) of fuel in a 22 hour period, has quiet operation and low fuel consumption, and uses my existing diesel fuel. It's mounted in the passenger seat base, so it's barely noticeable and utilizes existing empty space.
I also have a MaxxFan Deluxe 7500K electric fan over my bed area so I can get a nice breeze going. The MaxxFan Deluxe is the only complete ventilation system that incorporates a vent, fan, and rain shield in a single all-in-one unit. It has a powerful 10-speed intake and exhaust fan, a thermostat to control room temperature, and comes with a remote, plus it closes securely for a low profile appearance.
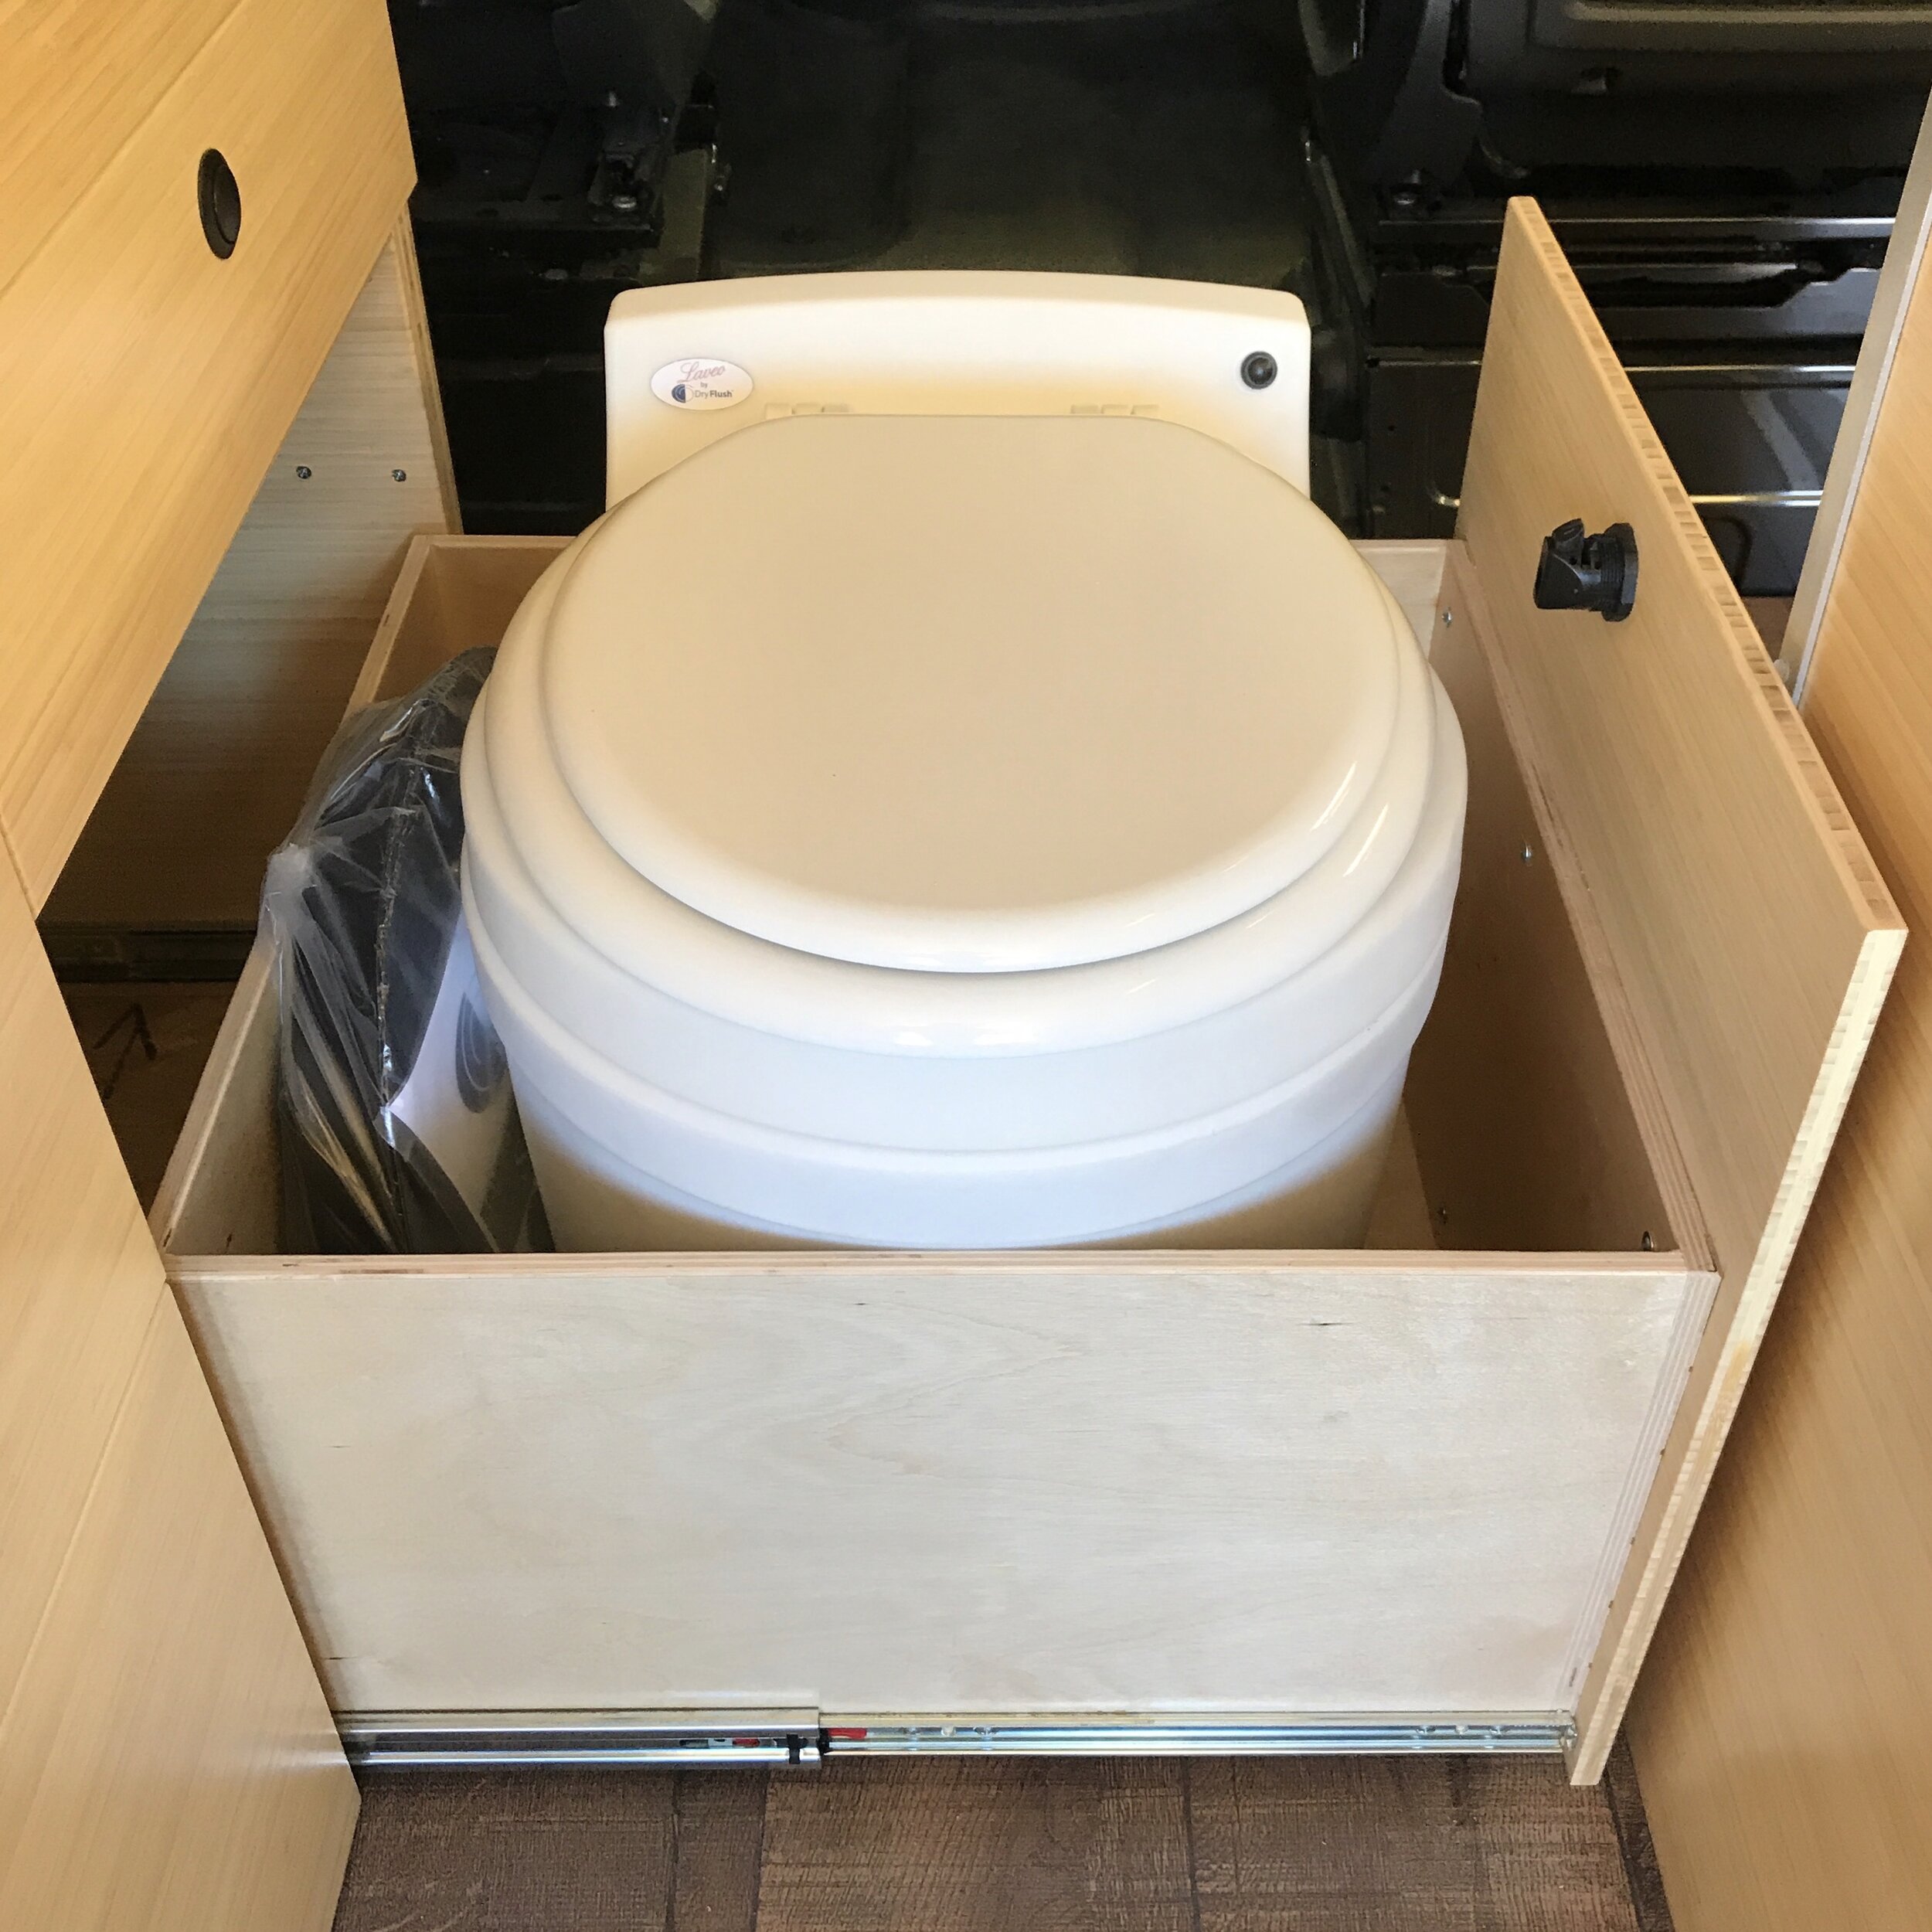
MEET ME IN THE BATHROOM
My toilet decision was key as I wanted something discrete that didn't smell up the van. Composting toilets sounded like cleaning a litter box and I heard that cassette toilets can easily smell up the van. Therefore, I went with a Laveo Dry-Flush Toilet, a Veteran owned and operated company.
Dry-Flush toilets are comfortable with their full-size, normal toilet seat and height, are discrete with no waste to see or smell, reliable with only one moving part, reusable with up to 17 uses per refill and the cartridges take less than a minute to change. It's the simplest maintenance in the industry since there's no black water to dump or chemicals to pour or store, and there's no odor due to their proprietary technology that encapsulates the waste.
I figured the best place for the toilet was as a pull-out drawer from the kitchen galley right behind the driver seat. EJ built the perfect drawer that pulls out and fits right in the aisle-way between the kitchen galley and refrigerator, and it supports your weight when you sit down so it doesn't wobble or move around. The Dry-Flush is battery operated, so I just have to charge it once a quarter or so with the provided cable.

BEDS ARE BURNING
My bed is amazing! EJ has a great connection with Century Upholstery and they made the most comfortable custom cushions for my practical U-shaded bed. The owner Ron looks at your color scheme to make some color suggestions and his first choice 'buckwheat' was absolutely the perfect match! The cushions are made from 3" firm foam with 1" soft foam layer on top and the durable fabric is treated with Scotchgard and UV protectant.
The bottom cushions fit snugly so they don't move around and the back cushions snap to the wall so they stay in place as well. Since I wanted a modular bed that could also be a dining area, my van builder figured out a practical way to add a piece of wood into the 'U’ and utilize the wall cushions to fit on top to make it a full-size bed for two people to sleep. EJ really thought of everything — that additional piece of wood piece folds in two via a piano hinge and fits in a secure slot against the wall inside my big cabinet next to the bed. This makes it practical to convert the twin bed/dining area into a full bed in 2 minutes.
I also have really cool CaliBamboo cork flooring in a muted brown shade called 'driftwood' that gives off a laid-back coastal vibe. The low-sheen matte finish with uneven marks and scrapes not only adds some character but it's also very durable and won't scuff easily. It is naturally hygienic, moisture-resistant, and an insulator that won't feel cold to bare feet.
JUNK IN THE TRUNK
I was stoked that the Sprinter I bought has 270 degree opening rear doors, meaning I can flip them all the way back to the vehicle's sides and have a wide open view from my bed. EJ installed two huge drawers under my bed, which are great for storing thing I don't need to access while in the van. Things like camping chairs, small camping fold-up table, hammock, my portable MoonShade awning (use code 'barbrocks' for $30 off), GoTreads tire traction mats, levelers, water hose, stepping stool, tarps, and more!
I also fill my 22 gallon water tank back there, making it so no one can ever mess with my water supply as it's completely internal to the van. You need a special key to open the water valve as well.
I have an outdoor shower! I just click in the shower hose to the valve and enjoy a quick rinse between the two rear doors. I bought the shower curtain from Quest Overland that attaches to the ends of the back doors via magnets and it includes two smaller pieces that block out the gap between the rear door and body of the van so I can shower in privacy.
I also have an additional storage cubby under my bed. Next to the water tank there was still room, therefore, EJ put in a nice little storage spot perfect for blankets, dirty laundry, sporting equipment, etc. I was also thinking it could be a great place to store extra beverages or things you don’t need to access often. There was also room behind the refrigerator in the passenger side galley, so I also have a big storage cabinet there that I use to store bigger items. I can fit two InstaCrate collapsible storage containers in there and still have room for other stuff!
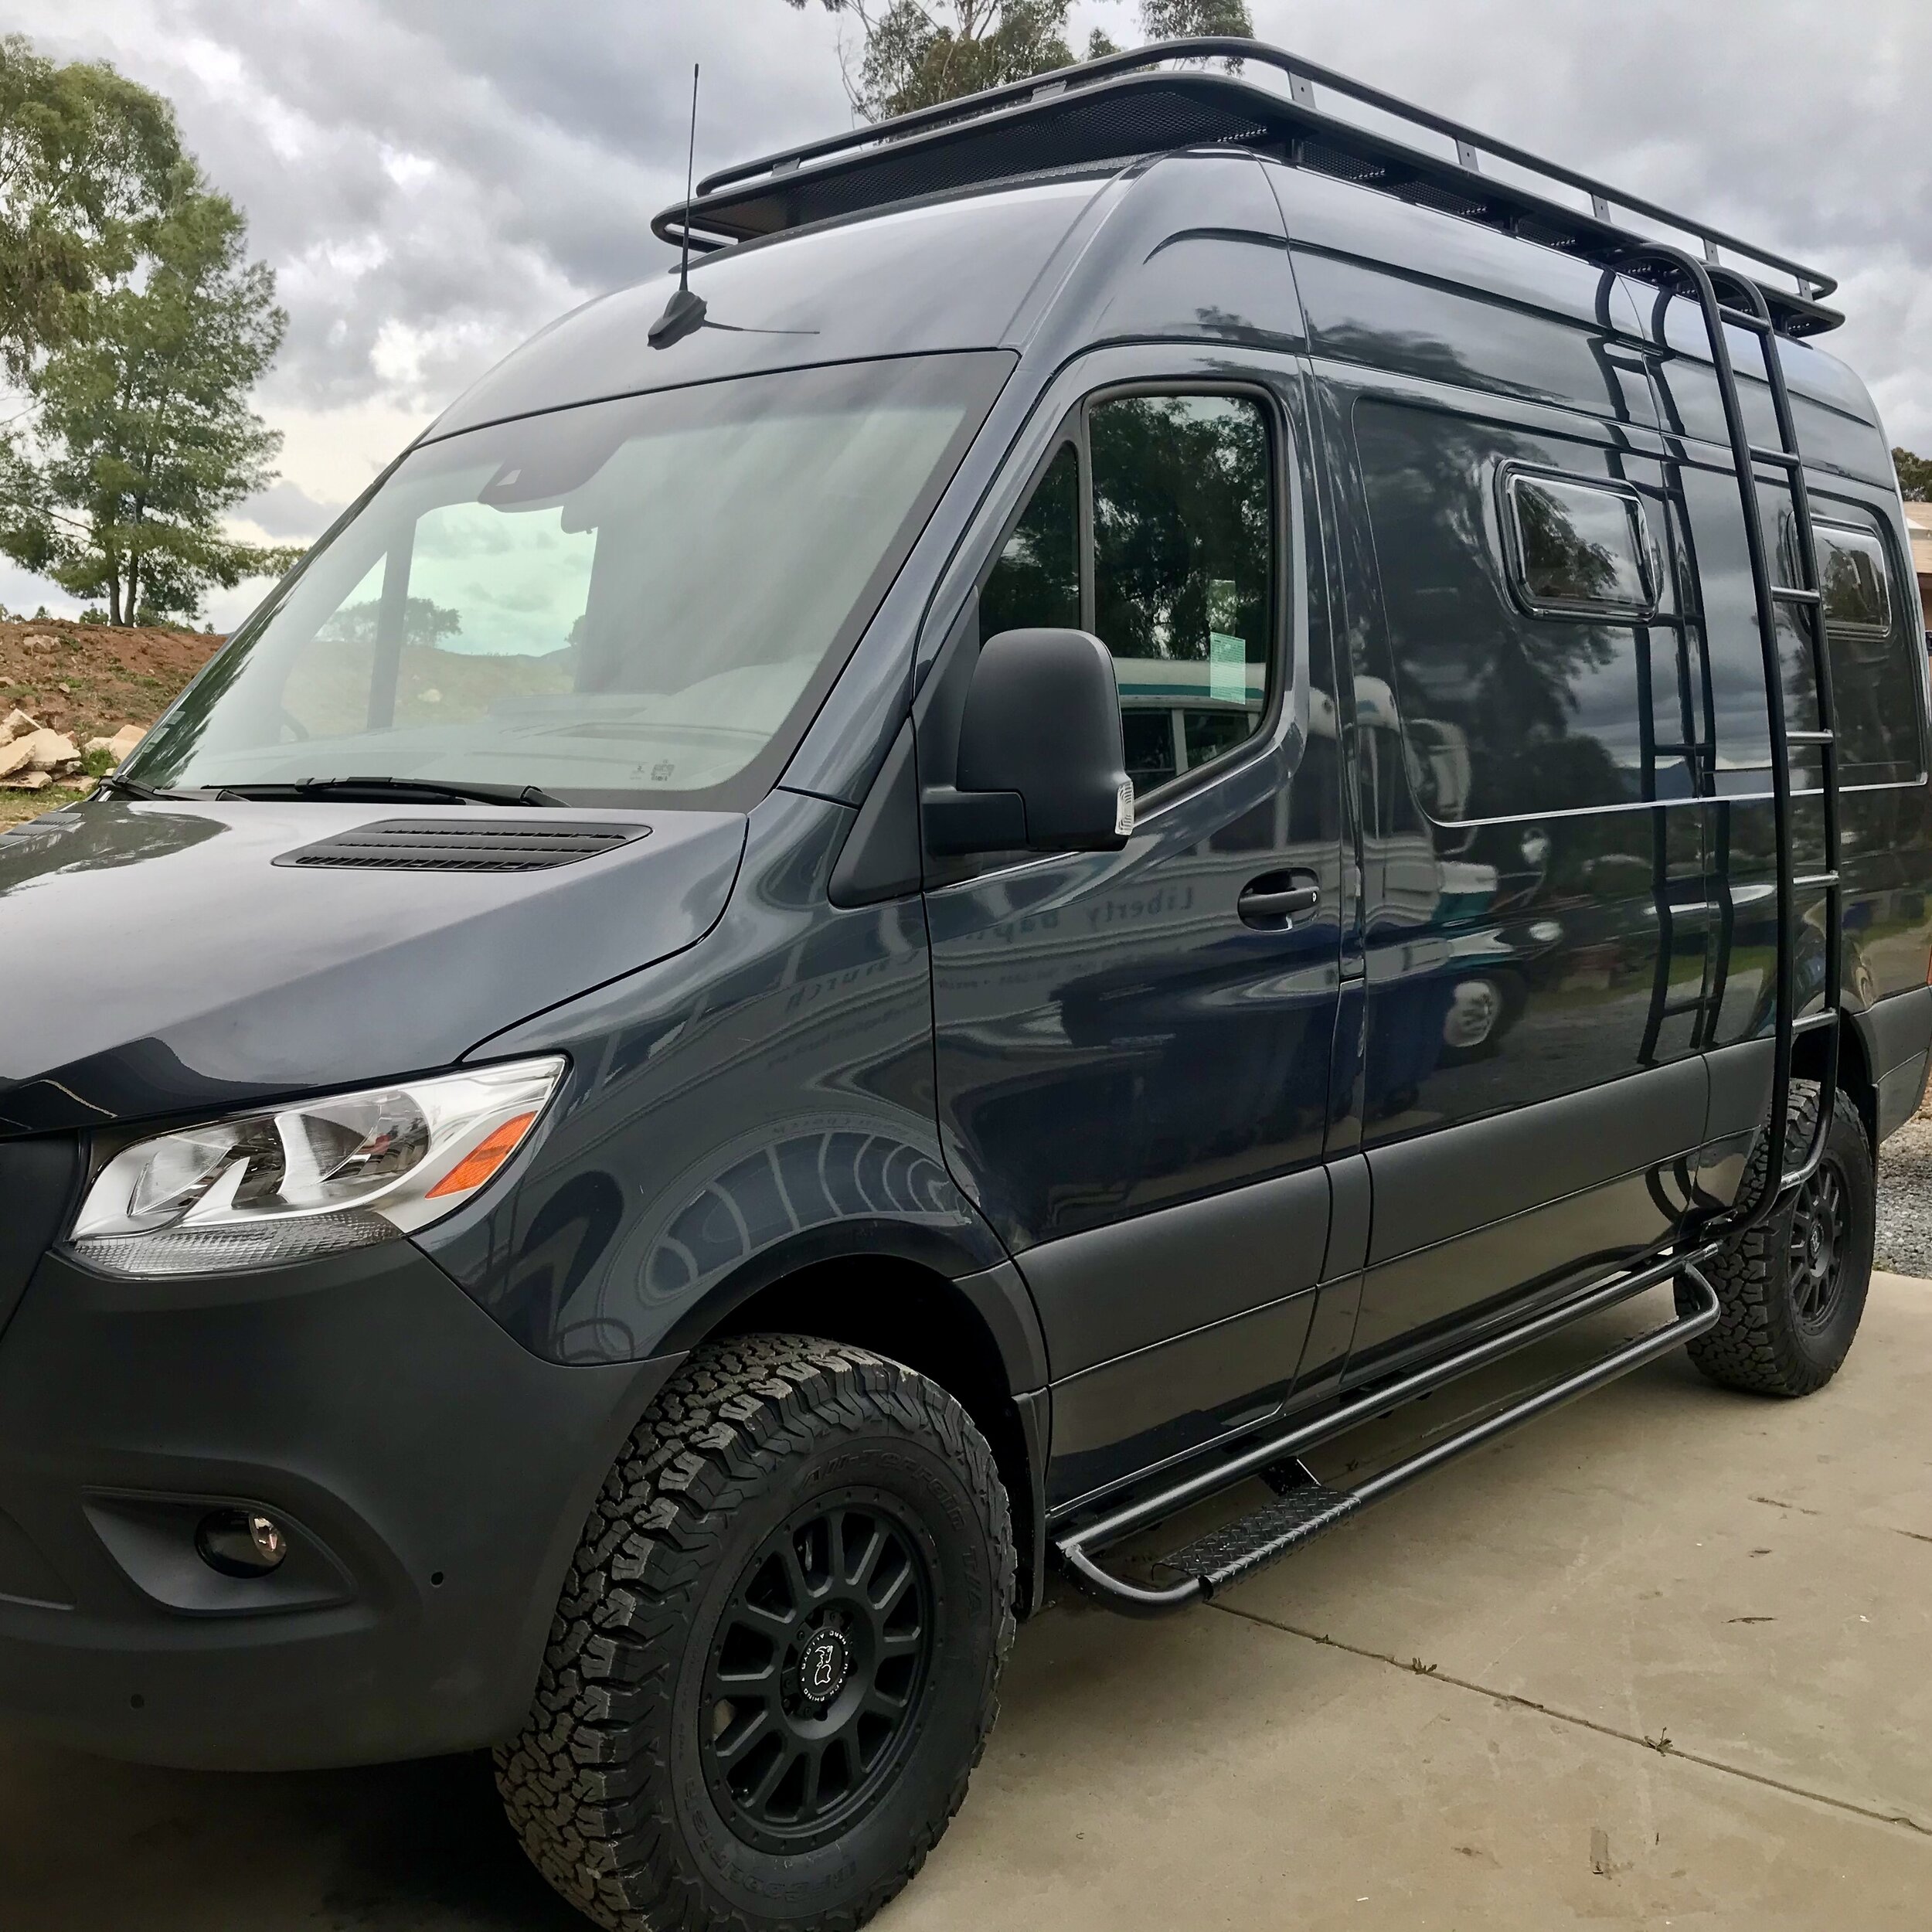
Wheel In The Sky
Once the interior of the van was done, EJ took my Sprinter to Aluminess to add some exterior additions. Since my Sprinter is pretty far off the ground, I had Aluminess add nerf bars to both sides which are designed to retain ground clearance, yet give me that extra step to easily get in and out of the van. I also had them add a roof rack and side ladder, giving me the option of carry more gear if need be. They custom cut-out the roof rack where my MaxxAir fan is, and the ladder allows me to easily access the roof to clean my solar panels, add more storage, or just get a better view of my surroundings.
Next, my van went to Agile Off Road to improve the suspension and wheels now that I have a lot more weight in the van. I purchased the Ride Improvement Package (RIP), which means they convert the front strut into a coil over with an assist spring, then add a complete leaf spring in the rear. I went from my 245/75R16 to 265/70R17 BFGoodrich All-Terrain KO2 wheels with some gorgeous Black Rhino Havasu rims. I also had Agile install an ARB On-Board Air Compressor so I could easily inflate my tires when needed. All these upgrades make the van look really tough and masculine.

Blinded by the Light
Thanks to EJ, I have some pretty amazing exterior LED lights mounted on the van’s roof rack! I have a front high-output light bar with two modes, a side light by the sliding door, a side light by the ladder, and two rear lights.
All of these lights are from OZ USA and they are really bright, especially the front bar! Each light comes with a different switch inside the van, right where you need it, which was very well thought out and quite convenient. I didn't really think I needed this much lighting, but I’m glad I listened to EJ. I can see how beneficial they can be when I’m out in the middle of nowhere.

Walking On Sunshine
With the interior done, the roof racks mounted, and the ride improvements completed, all that was left to install was my solar panels onto the Aluminess roof rack.
I have two 160 watts semi-flexible solar panel from Overland Solar, totaling 320 watts together. These panels are only 22x58", 3mm thick, and weigh 6 lbs. At 23.7% median efficiency, these SunPower® Gen 3 cells have the highest crystalline silicon production efficiency in the world, meaning the panel produces almost 30% more power than a standard solar panel with 18.5% efficiency even though both have the same watts. On top of the high efficiency, these panels will still perform well even when some cells are shaded and do better in higher heat.
The Blackout
To ensure good times in areas near water which attracts those pesky bugs, I wanted some good screens for the sliding door entrance and rear doors so I could still enjoy the fresh air. I heard about the Canadian company Rolef that makes awesome screens, but sadly they have a long waitlist and their prices are quite high. A few of my vanlife friends made their own using magnetic screen doors you buy on Amazon and sewing them to fit, but I'm not that crafty, nor do I own a sewing machine.
I looked into other options and found some great magnetic screens from Ripplewear on eBay. These screens are made with tiny mesh and 2" strong, durable polyester webbing wrapped around the edges. The strong rare earth magnets sewn inside attach to the frame of the Sprinter easily. The rear screens can be rolled back to the door edge and secured with polyester tiebacks that have been stitched in so they stay in place, even with the rear doors closed. The screens even come with a zippered nylon Cordura storage bag.
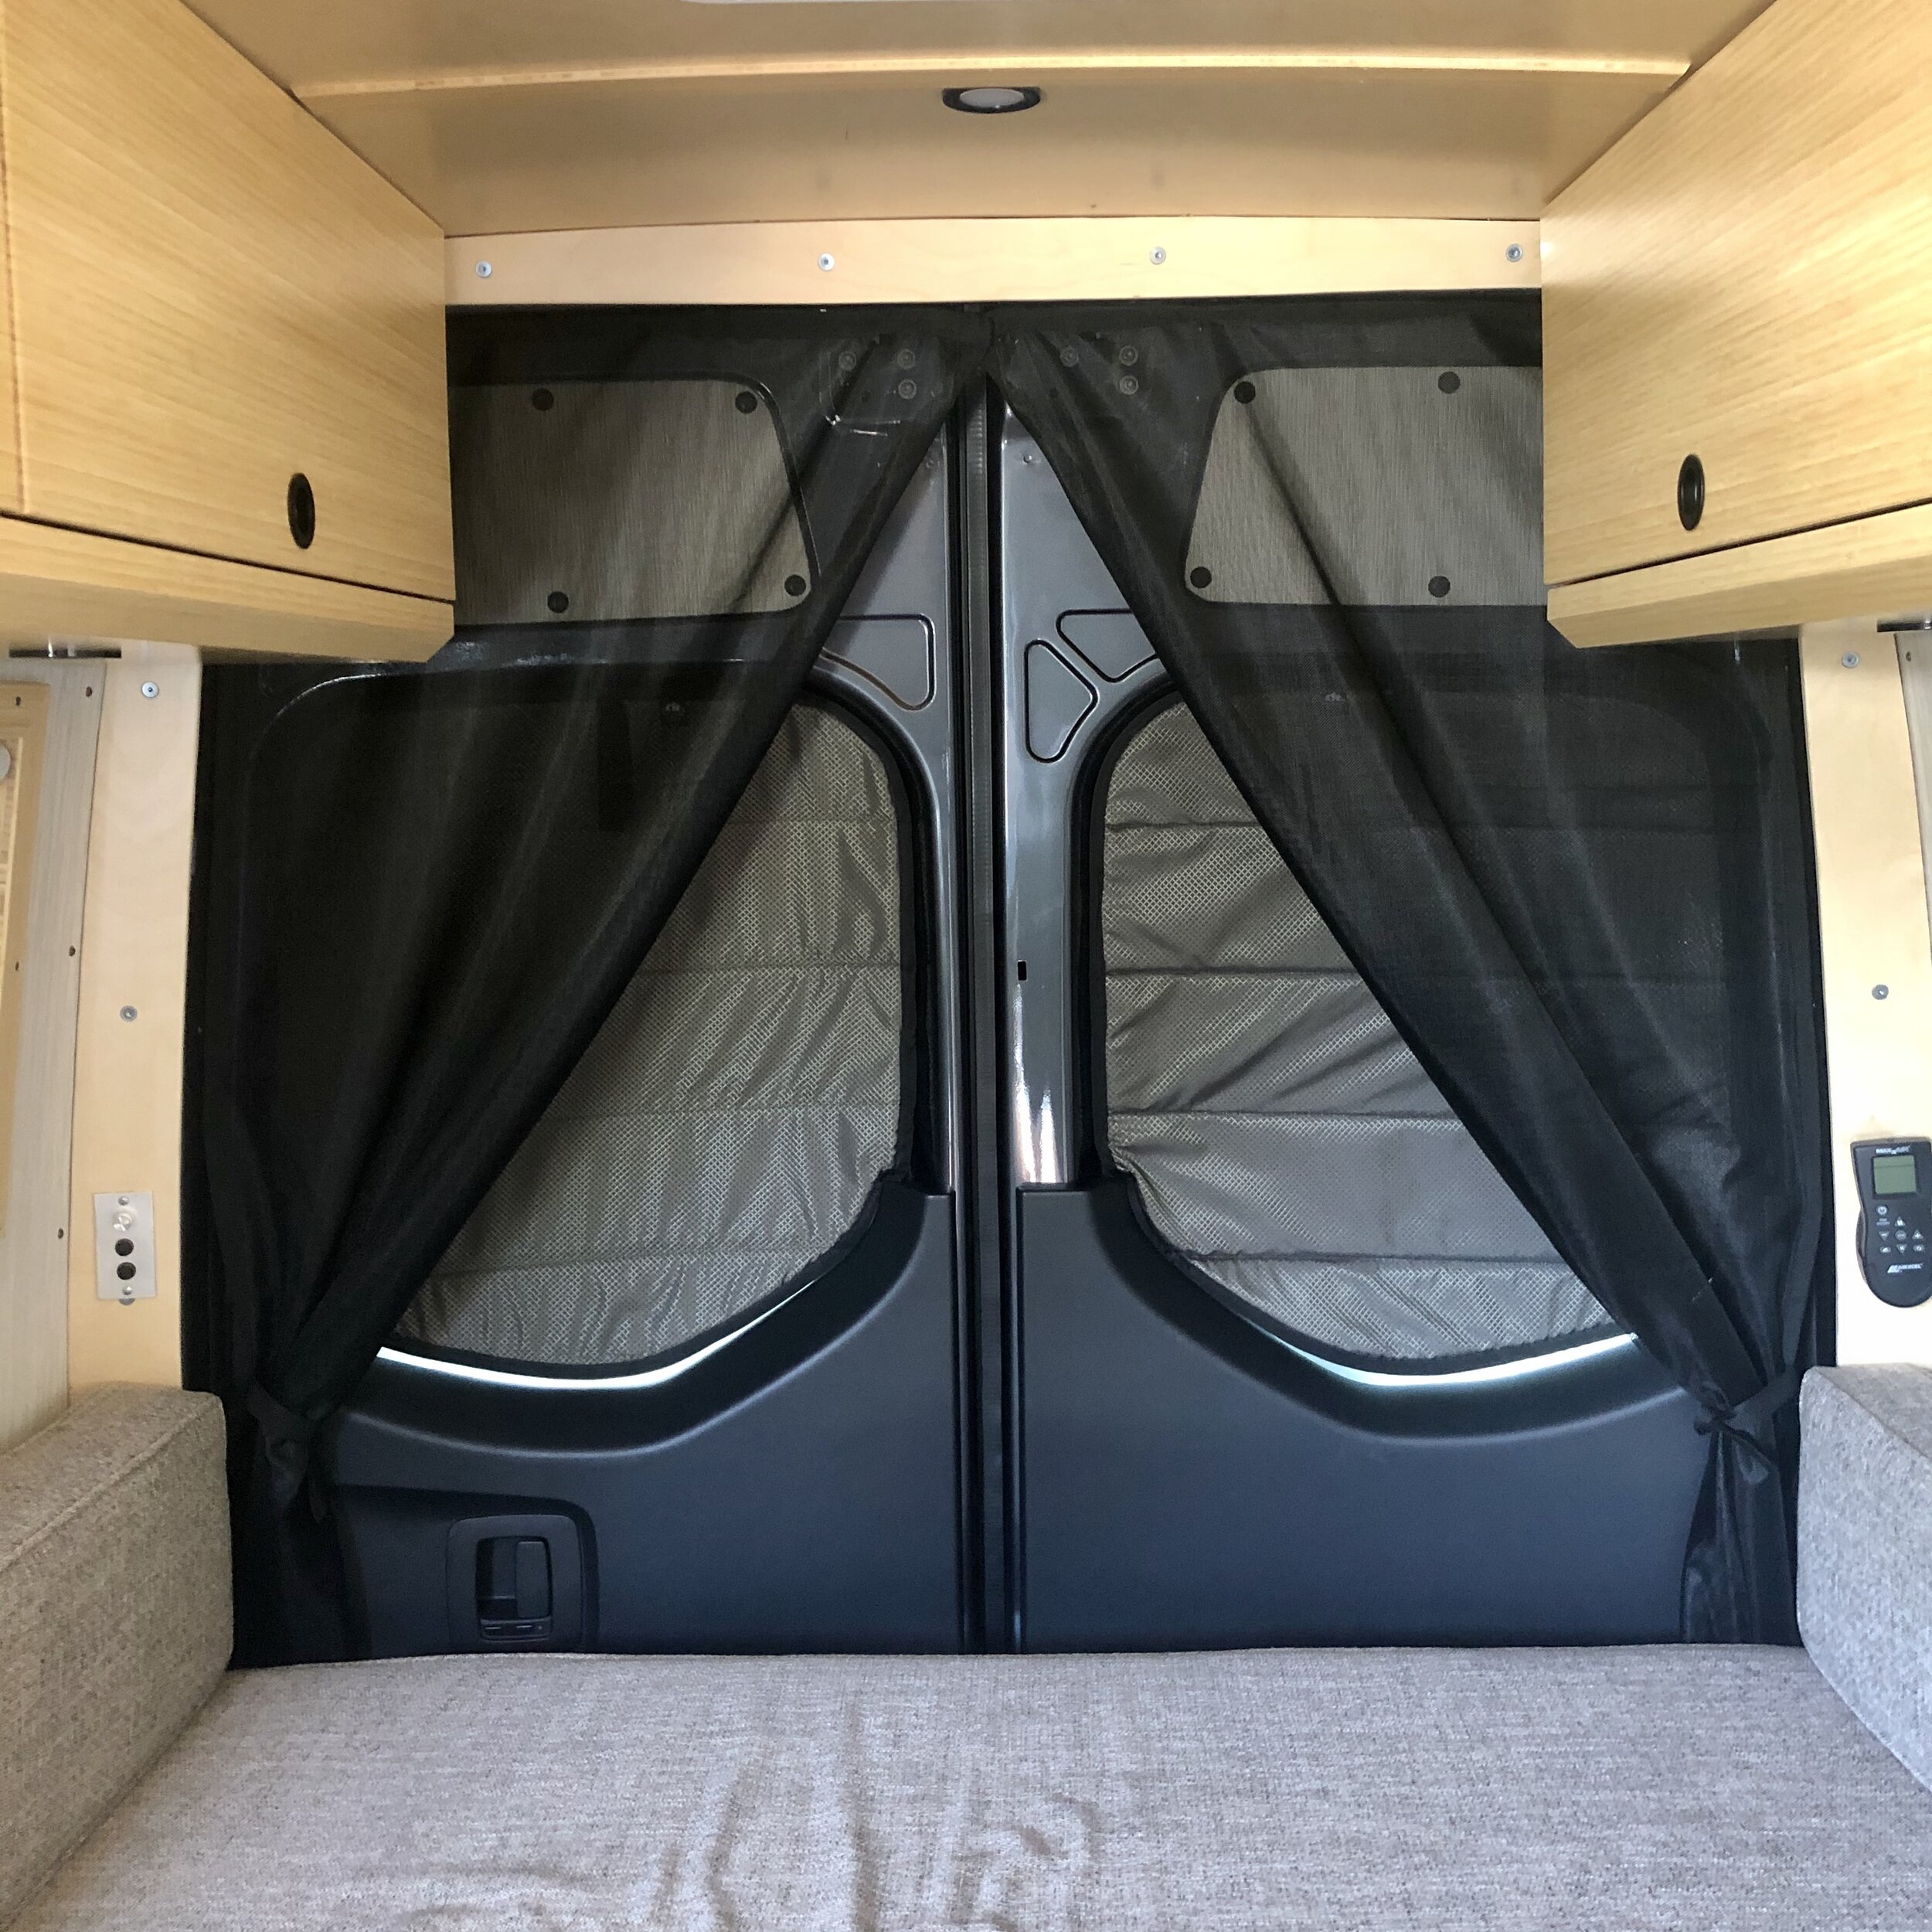
For privacy and to keep the heat out, I bought the insulated window covers from Quest Overland for the windshield, cabin doors, rear doors, and roof fan vent. The quality of these covers is amazing; the sewing is top notch, there's nice straps and strong ribbon around the outside to hold the according-style foldable pieces secure when not in use, and they use super strong, waterproof ripstop nylon and premium thickness Low-E foil-faced insulation. The outside fabric is black and literally "blacks out" the windows at night so no light comes through, making the van very stealthy. The inside fabric is a nice neutral gray which blends perfectly with my van's color scheme. I chose the cabin door shades that have screen vents so that I can fold then down and crack the windows for some good airflow. I'm highly impressed with these window covers and recommend them to other vanlifers looking to improve their window coverings. Use code “barbrocks5” to save 5% in their shop! UPDATE: Hally & Ian the founders of Quest Overland sold the company in September 2023 and the new owner Josh is not fulfilling orders nor replying to emails. I sadly can no longer recommend this company to people unless the new owner gets his business affairs in order and customer service improves.
Light Up The Night
I love how my van looks at night all lit up inside! The lighting is perfect with Dream Lighting LED recessed fixtures from Amazon, a great choice by EJ. Check out my awesome van builder EJ in the last photo posing perfectly in the lighting with my zebra table (link to IG post under photo).
The lighting is smartly divided into three sections:
1) the front kitchen area has four ceiling lights controlled by a dimmer switch by the sliding door behind passenger seat.
2) the back bed area has two ceiling lights controlled by a dimmer switch by the rear door on passenger side.
3) the upper cabinets have a total of six lights underneath (four under driver side & two under passenger side cabinetry), all controlled by a dimmer switch near the kitchen sink.
This gives the van multiple lighting options depending on the needs and mood. Plus with the switches at the right places, it makes for a smooth transition from being upright cooking, to sitting down on the bed reading or working on my laptop, to laying down and sleeping.
People are always looking for vanlife hacks, so I’m going to share a cool lighting one I discovered at a vanlife meetup. I learned about Mini USB LED Lights from Mike (aka Drawn.There) that are perfect to plug into your USB ports if one person is sleeping while the other still needs some minimal light. They aren’t very expensive on Amazon and they can be used as a nightlight or emergency security lighting.
If you’re interested in other convenient and handy things I use in my van, visit to my Amazon storefront and check out both my ‘vanlife essentials‘ and ‘van build’ lists!

BIG ENERGY
This is my attempt at a geeky post on how I can monitor all my Victron Energy products in my Sprinter. I’m honestly still learning how it all works, but I’m sure that will come with time.
I use the VictronConnect App to monitor, operate, configure, and diagnose all my Victron products. It connects to them via Bluetooth, USB and WiFi/LAN/Internet. I can get real-time insight and historical data and have complete control via my phone and laptop, all through an intuitive and clean interface. Aside from monitoring, I can also operate my device, easily control the shore power input current limit or switch on my inverter. The app is the perfect tool for the installer to quickly and efficiently configure the system after wiring it. Plus it's safe, quick, and easy to perform a firmware update of my Victron products. No internet connection is required, no files need to be selected or downloaded, I just connect to the product in the app.
On my wall-mounted instrument panel, I can see if my battery is overloaded, if the battery is low, if the battery temp is too hot or too low, and various other things. That’s also where I set the shore current limit, which I have been told to set to 15 when plugged into a house and 30 when plugged into a 30amp shore power at a campground. It’s so easy to use the VictronConnect app to update the software files on all the devices and I find the historical data and trends pretty fascinating.

Standing in the Shower... Thinking
I know I previously posted about my outdoor shower out the rear of the van, but I wanted to show you in detail how it all works. It's such an easy and practical system!
I simply connect the Dura Faucet spiral hose to the valve and turn it so it clicks in, then turn on the hot and cold knobs and press the shower nozzle handle. There's multiple spray settings, but I prefer the "shower" mode. To conserve water, I turn the water on and rinse off quickly, then shut it off and lay the shower hose and nozzle down on my bumper while I lather up, then turn it on and rinse off. When not in use, the shower head and hose fit perfectly in my rear door cubby hole.
I have a fantastic shower/privacy curtain from Quest Overland that is made of heavy duty, waterproof ripstop nylon. Extra powerful N55 Neodymium magnets attach it to the rear doors of the Sprinter van and it comes with two smaller pieces that block out the gap between the rear door and body of the van for full privacy. A handy storage bag is included and the whole thing fits perfectly in my rear door's cargo net pocket. Use discount code barbrocks5 to save 5% on Quest Overland products!!
Last but not least, I have a foldable step stool so I don't need to stand on the ground and my feet stay clean. The stool has a traction surface so I don't slip and fall. Having a step stool is also great for when I want an easier step in and out of the van when camping, or if I need to reach something up high, so I like having one that stores away easily and doesn't take up much room. The step stool barely takes up any room in one of my rear storage drawers.

A Horse With No Name
Naming your van is an important step. For some this is easy and a name just comes to them. For me this was a process. My first inclination was to name my van Shadow, but there was something about it that just didn't feel right because it was too basic, too common. I like unique names, so I started to look into various inspirational elements that could possibly lead to a good van name. Plus my van's metallic tenorite gray color also influenced the naming process.
I browsed through some mythological names I've always liked, then combed through some literature for some ideas, discovered some cool minerals that could apply, and even looked into astronomy to see what would catch my interest. I was thorough and looked up their meanings since I wanted something that shouted travel and adventure.
That's when it happened. I was watching a Netflix show called "The Letter For The King" inspired by the classic Dutch novel "De brief voor de Koning" by Tonke Dragt. There's this beautiful black steed named Ardanwen that really steals the show and I knew the minute I heard the horse's name, that it was the perfect name for my Sprinter. The book tells of a fiery, strong and noble black horse (also called Nightwind) that belongs to the Black Knight, and in the series, Ardanwen is a true hero that saves the day multiple times. Vehicles are basically the modern-day horse and engine power is measured in terms of horsepower, so it just clicked for me.
I had some fun with an official christening ceremony celebrating with my favorite champagne Veuve Clicquot, which I popped open over the Mercedes Benz emblem in the front grille. This is ARDANWEN, my 'nightwind' and champion on the road!

SOLAR POWER
In January 2021, I took at trip down to Southern California to have my van builder EJ of Johnson Custom Van Solutions fix my solar system. For some unknown reason, my Overland Solar panels stopped charging my battery back in November 2020. EJ’s electrician Skye came and checked out the system. After various analysis, he decided to change out the Victron Energy MPPT 100/30 Charge Controller, which he believed was the culprit. Luckily EJ had a new MPPT 100/50 on hand, an upgrade from my 100/30. Sadly we couldn’t verify that this MPPT replacement fixed the problem since the sun was already too low in the sky, but we were definitely hoping for the best.
To our dismay the next morning, it still wasn’t charging. Therefore, EJ and I came to the conclusion that it was my solar panels that weren’t working. Since I couldn’t wait for replacement panels, I made the decision to buy new ones that day, so EJ and I went to Agile Off Road to see what they had available. I ended up buying three 110 watt Zamp Solar Legacy panels, which EJ and Skye bolted down to my roof rack that evening. They also put my MPPT 100/30 Charge Controller back since that wasn’t the culprit. Good news is that the new panels worked and my solar system was back on track! My Zamp Solar panels have been working great, even when it’s cloudy out. My Victron battery hasn’t had any problems charging, even in Washington state weather, though the cold winters require some heat for the battery compartment to keep it from shutting down in self-protect mode.
While I was in Jamul, EJ also did some minor fixes on my van like replace my faulty water gauge, line-up my drawers which had shifted with the weight in them, remove the moisture bubbles out of the vinyl wrapped walls, and sand down the inner edge of my fridge side counter that was rubbing against the metal shell. EJ also added his new emblem to the front panels of my van, showing off his cool logo wherever I go. I really appreciated all the hard work both he and Skye put in to get my van into prime shape again!
I would like to give Overland Solar a shout-out as they really did right by me regarding the defective solar panels. The owner Brian called me personally and gave me a full refund. I’m super impressed with their customer service and miss their low profile flexible panels that took up way less rooftop space. Turns out that somehow the panels got damaged during my October 2020 road trip, though we still don’t know how exactly.

BROKEN VALVES
In January 2021, my gray tank valve stopped working. This was quite disappointing since I’ve only had my van for 10 months and it had less than 8K miles on it. I had a good friend of mine who’s a handy man look at it, and luckily the valve was stuck in the open position, which meant that my gray tank would drain and not fill up, so I dealt with a non-functioning solenoid valve for 5 months until I could find someone to work on it.
From February through April that year, I became very active on the drop-in audio app Clubhouse and met a lot of vanlifers and nomads on there. One of the people I met was Amanda from the Solo Female Travel Network and she had recently met Bill Franz from Franz Customs, who was fixing some issues on her van, so she put me in touch with him. Bill ended up being at Descend on Lost Sierra over Memorial weekend, same as me, and during that vanlife gathering, he fixed my gray tank valve issue.
Bill wrote up a very detailed email about why my solenoid valve stopped working, why that type of valve was not a wise choice, and why the ball valve he replaced it with is a better solution. If you’re building out a van, I urge you to read my blog post that contains all this information as Bill was very thorough with diagrams and photos. I’m so glad I met Bill and am extremely thankful for his knowledge and hard work. Not only did he sacrifice his time at a fun gathering in hot weather, he also charged a very reasonable fee for his work. He cares about people and wants to help them out however he can. Bill is based out of Santa Cruz, CA, but he also travels around the country, so if you ever need any work done on your van, I highly recommend him! He also posted about the fix on his Instagram page.

TAKE THE BOX
After I bought my Aventon Pace 500 Step-Through eBike, I knew I needed a convenient bike rack to take it on my road trips. I looked at all the available bike racks online and didn’t really like any of the choices, plus I wanted a big storage box that could hold my inflatable paddleboard and other supplies. Because I couldn’t find a solution that fit my needs and desires, I decided to look into a custom solution. Through some local contacts, I was referred to Ryan and Ken at Carrve Custom Vans, a great team at a local van building shop. Ryan was super helpful and excited to come up with a solution for me.
Check out my blog post for more details on why existing solutions didn’t appeal to me and for all the details on the solution Ryan came up with and built for me, including links to all the parts.

Shelf In The Room
While I was at Carrve Custom Vans for my custom hitch storage and bike rack solution, I saw the great work Ken did on a headliner shelf in his own van, so I asked him to make me one. Even though I’ve enjoyed the headroom in the cab part of my Sprinter, I didn’t have a great place to store my Quest Overland window covers, as well as blankets and pillows, and other bulky items that don’t fit in my cabinets well.
Ken did a great job building and installing the headliner shelf. Since my van build was already done with cabinets in place, it was a matter of lining everything up exactly so the headliner shelf fit in, which required a little extra work of removing the Sprinter visors, and in the end, everything lined up perfectly. The best part is that the black headliner shelf works well with my existing build color scheme, as well as the dark gray cab interior, and it doesn’t take away from the overall look and feel.

COME TO MY WINDOW
When I designed my van’s layout and build, I didn’t think I wanted a lot of windows because any non-insulated opening can bring heat into the van on hot days, as well as allow heat to leave the van on cold days. Therefore, I went with three smaller Tern Overland windows, one of each end of the bed and one at the kitchen galley. In the past 3.5 years using my van, I realized that I would love to be able to see the outside views more when I’m inside the van, especially on a cool night or in a place with bugs when I didn’t want the sliding door open. Any time I was in someone else’s van that had a window in the sliding door, I realized what I was missing out on. Another reason to get a window installed was that the wooden panel that was put onto the sliding door during my original van build always rattled when I was driving. From what I’ve been told by a few builders now, this is a common issue with panels on the sliding doors, plus they get loose over time from all the opening and closing of the slider.
Freedom Vans is a well-known and reputable van building company in Bellingham, so I showed them my rattling panel and discussed window installation options. During our conversation, the company owner Tim told me that a wonderful advantage of having a window in the sliding door is the ability to see out while driving. Often when you need to turn into traffic, without a window there you have limited visibility on the right side, so being able to look over your right shoulder and see out that back side window is super helpful. I was also very impressed to learn about all the pros and cons of each after-market window styles and seeing them in action on some the van builds they were working on.
After some deliberation, I decided to go with the AMA Slider with Fly-Screen. Check out my blog post about why I chose this brand and style compared to the other options on the market, as well as information on where you can order these different types of windows. The installation only took a half a day and then the glue needed to set overnight. I’m super happy with how it turned out!
I also have the Sliding Door Window Cover from Quest Overland to blackout that window as needed, which matches all my other interior blackout shades from this wonderful company. Use code “barbrocks5” to save 5% in their shop. UPDATE: Hally & Ian the founders of Quest Overland sold the company in September 2023 and the new owner Josh is not fulfilling orders nor replying to emails. I sadly can no longer recommend this company to people unless the new owner gets his business affairs in order and customer service improves.

Big Wheels
Thanks to Agile Off Road for posting about my Sprinter with some awesome photos of my van!
They gave my van builder EJ a lovely shout-out stating, “Another spectacular Johnson Custom Van Solutions build.”
Their post also mentioned they equipped my van with their amazing RIP Kit, ARB On-Board Air Compressor, Black Rhino Havasu Rims, and BFGoodrich All-Terrain KO2 Tires.

Don’t Roof Rack Me Bro
Thanks to Aluminess for posting about my Sprinter on their Instagram! They gave my van builder EJ some kudos as he works very closely with them on many of his builds.
My van (which is the top two photos and the bottom left) is outfitted with wonderful Aluminess gear —> roof rack, side ladder, and nerf sidestep bars.
Aluminess has featured my van a few other times as well, including this one of my cat Maverick and I camping at Bay View State Park, this one of me camping with friends at Pinecrest, and this one featuring my original solar panels.

LIFE FROM A WINDOW
Thanks to Tern Overland for featuring my Sprinter on their Instagram page a few times! First in August 2020, then in September 2020, and lastly in February 2021. Seeing my van with their awning-style windows featured on their page is super cool, plus they’ve used my photos in their newsletter and even in an Instagram ad. They held a giveaway in Summer 2020 and I won the Novus Plastic Polish cleaning kit they recommend, which works great!
Road Trippin’
I thought it would be fun to create a vanlife playlist that included songs about being on the road, traveling around, enjoying the ride, and coming home. But why stop there? I also added tunes about experiencing adventures, feeling wanderlust, relishing wide open spaces, taking it easy, various roadways and destinations, and anything vehicle related. It’s a diverse playlist with tunes from all genres, including classic rock, country, blues, electronic, hip hop, metal, and everything in between. I like to play it on shuffle and just enjoy whatever song comes next. If you’re open minded, have broad musical tastes, and/or enjoy discovering new music, then VANMEOW might be your next road trip jam, named after my Sprinter’s license plate! If you have any song suggestions to add, just let me know — I’m always looking for more awesome music.